For one of my side projects that I’m currently working on, I decided to implement an AppleScript interface. Designing and implementing one wasn’t that bad, although Apple’s AppleScript documentation was sometimes confusing. Fortunately, CocoaDev has a good overview on how to implement AppleScript support.
However, one of my frustrations with working with other app’s AppleScript interfaces was trying to figure out how the interface was intended to be used. Sure, the AppleScript Editor would show me all the actions and classes, but it isn’t always obvious how things are supposed to fit together. Something that would help in these cases is AppleScript recording. I could record the app performing the actions I cared about, then examine how the app itself used the actions and classes. Unfortunately, it seems like only the Finder and BBEdit ever got around to implementing AppleScript recording.
In the hopes of increasing the number of apps with AppleScript recordability, I’m going to document my approach to implementing it. For brevity, I’ll assume you’ve already an AppleScript interface implemented for your Cocoa app.
Thinking Big Design Thoughts
If you have an AppleScript interface for your application, you may think of your app architecture as something like this:
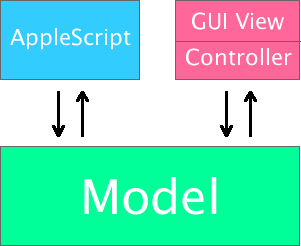
Here your AppleScript interface and graphical interface are independent peers, and both modify your model classes directly to accomplish your application’s tasks. Each interface is separate and largely ignorant of the other.
However, when implementing AppleScript recordability it is helpful to think about your app’s architecture in a different way:
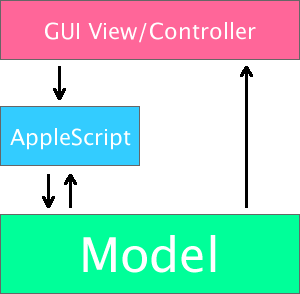
In this case the GUI is dependent on, and implemented in terms of, the AppleScript interface. The general guideline is that anything the GUI does that mutates or alters the model goes through the AppleScript interface. However, if the GUI simply needs to access or get information from the model, it would go directly to the model, not through the AppleScript interface. Accessing the model can happen at seemingly random times to the user, and spamming the AppleScript Editor with these accesses when recording only confuses the user.
Suppose an application has table view and a button that deletes the currently selected item in that table view. The table view data source would be implemented the standard way, simply going directly to the model, bypassing the AppleScript layer. However, the delete button, since it alters the model, would be implemented by invoking the AppleScript delete command on the object represented by the current table row.
This design has some other benefits besides recordability. Notably it helps test your AppleScript interface design and implementation. If you find that implementing a GUI feature in terms of your AppleScript interface is impossible or difficult, congratulations, you found a bug! Also, merely testing your GUI also exercises your AppleScript interface. It is not a replacement for testing your AppleScript interface explicitly, but it certainly helps.
Implementation Hardships
Everything I’ve talked about so far hasn’t been all that novel, and probably has been met with large bucket fulls of “well, duh”s by anyone who’s ever looked into implementing AppleScript recording. The problem isn’t thinking about how to design in recordability, but actually implementing recordability.
As things stand now, doing something as simple as “invoking the AppleScript delete command on the object represented by the current table row” is incredibly involved and painful. You have to manually build up the AppleEvent that represents the delete command and the target model object using functions like AEBuildAppleEvent or classes like NSAppleEventDescriptor. Then you have to remember to target your app by specifying the kCurrentProcess process serial number (specifying kCurrentProcess as the ProcessSerialNumber is currently the only way to enable recording. Bundle identifiers, urls, and pid_t’s do not work.), and parse the AppleEvent you get back into something useful. You’d have to do this for every property or method on your model object you want exposed for recordability.
Dreaming of Ponies
The thing is, the Cocoa runtime has a lot of the AppleScript information from your SDEF file at its disposal and could theoretically generate these interfaces for you. In the ideal hypothetical situation, invoking the delete action via AppleScript inside your app could be as simple as:
// Suppose ONEmployee is our model object, with the appropriate AppleScript interface implemented
ONEmployee *employee = [_employees objectAtIndex:0];
ONEmployeeASProxy *proxy = employee.appleScriptInterface;
[proxy delete];
Here, any object that implemented the objectSpecifier method for AppleScript support would automatically get an appleScriptInterface property. The object returned by appleScriptInterface would be a proxy object implementing the same methods and properties as the original object. The proxy object would implement these methods by building up the appropriate AppleEvents, sending them, and parsing the resulting event back into a usable object.
Apple actually gets tantalizingly close to this with the Scripting Bridge. Outside users of your app can run your SDEF file through the sdp command line tool and get a nice Objective-C interface of proxy objects that build, send, and parse AppleEvents to and from your app. However, there is not currently a way tell these proxy objects to target kCurrentProcess, or to initialize one of the proxy objects by passing in a model object that implements objectSpecifier. (I’ve written this up as rdar://problem/7359646.)
Harsh Reality
Since I didn’t want to wait on Apple to extend the Scripting Bridge to make my life easier, I decided to write a couple of classes to help out. You can download the code here. The code is under the MIT license.
The classes work similar to the SBObject and SBElementArray classes in the Scripting Bridge framework. Using these classes, you can invoke the delete AppleScript method like so:
// Suppose ONEmployee is our model object, with the appropriate AppleScript interface implemented
ONEmployee *employee = [_employees objectAtIndex:0];
[ASObj(employee) invokeCommand:@"delete"];
The ASObj function creates an ASObject proxy object for any NSObject that implements objectSpecifier. invokeCommand takes care of marshalling the parameters into an AppleEvent, sending it, and unmarshalling the return value into an NSObject. The name of the command is the name of the name used in AppleScript, not the Cocoa implementation.
invokeCommand can take parameters, although it gets more tricky:
ONEmployee *employee = [_employees objectAtIndex:0];
[ASObj(employee) invokeCommand:@"giveRaise" with:[NSNumber numberWithInt:10], @"Percent", nil];
First, the parameters must be named (it’s not done by parameter order), and those names must match the Cocoa Key in the SDEF, not the user visible parameter name. Second, the marshalling code (from random NSObjects to AppleEvents) is a bit sparse. I’ve only added code for the types I needed for my project. If you use it, you may need to add support for other types. The same goes for return values; I only added support for the types that I use.
ASObject also has support for properties. For example this marks an employee as exempt:
ONEmployee *employee = [_employees objectAtIndex:0];
[ASObj(employee) setObject:[NSNumber numberWithBool:YES] forProperty:@"isExempt"];
The same type restrictions for parameters apply to properties as well. The Cocoa Key for the property must be used here, the same as parameters.
Elements also have basic support, which is where the ASElementArray comes in. Right now the only interesting thing to do with an element array is retrieve a reference to a specific element:
ONEmployee *employee = [_employees objectAtIndex:0];
ASObject *dependent = [[ASObj(employee) elementForKey:@"dependents"] objectAtIndex:0];
[dependent setObject:[NSNumber numberWithBool:YES] forProperty:@"insured"];
Unlike other methods, ASElementArray‘s objectAtIndex does not execute an AppleEvents or otherwise take any actions. Instead it constructs an object specifier (i.e. an ASObject) for the given element.
The code is still somewhat rough and incomplete, but should help with anyone wanting to implement AppleScript recording. If nothing else, it should serve as a starting point or sample code for anyone rolling their own solution.


