
An alternate way to implement marching ants
After my previous article on how to implement a magic wand tool, I got an email from Will Thimbleby suggesting an alternate way of implementing marching ants. You might know Will from the most excellent vector graphics program, LineForm. So if you like the new approach, go buy a few dozen copies of LineForm.
Overview
As I mentioned in the previous article, converting an image mask to a vector path is not exactly a cheap operation. Will suggested much simpler way that involved using strictly Core Image.
The basic idea is to use the CIStripesGenerator Core Image filter to generate us up some black and white vertical lines. We then do an edge detection filter, CIEdges, on our selection mask to calculate a new mask, representing where the marching ants should show up. We then do a multiply composite, using CIMultiplyCompositing, to merge the striped lines with our marching ants mask. The result is the stripes only show up at the edges of the selection mask. Ta-da, marching ants.
OK, its a little more complicated than that, but the previous paragraph should give you a pretty good idea what’s going on.
Code
Like before, I have sample code to go along with what I’m going to show. However, unlike before, this sample code is heavily based on the previous article‘s sample code. In fact, I really only modified one class from the Magic Wand sample code. So instead of going through all that code again, I’m going to assume you know how it works, and only highlight the new stuff.
SelectionBuilder
OK, I have to admit right off the top I lied about only having to modify one class. I had to modify SelectionBuilder slightly in order to get the generated mask to work with Core Image.
Instead of generating a true image mask via CGImageMaskCreate, I had to create a CGImageRef with a grayscale colorspace and no alpha. This meant that I had to:
- Flip the colors. In SelectionBuilder, black now means not in the selection, while white means in the selection. In the init method, the mask data is calloc’d and left zeroed out. When we mark a point in the selection, we set it to white.
- Use CGImageCreate instead of CGImageMaskCreate.
Fortunately, CoreGraphics doesn’t care, outside of mask creation, if it’s really an image or an image mask. So no other classes or code had to be modified for this particular change.
CanvasView
CanvasView is really the class that had to change, and it was mainly in the drawRect method. Other than that, it was simply stripping out the mCachedPath member data since it wasn’t needed anymore. In fact, I’m only going to cover the drawRect method. If you would like to see how the rest of the code changed download the sample code.
The new drawRect method starts out normal enough:
- (void)drawRect:(NSRect)rect {
	// Simply ask the canvas to draw into the current context, given the
	//	rectangle specified. A more sophisticated view might draw a border
	//	around the canvas, or a pasteboard in the case that the view was
	//	bigger than the canvas.
	NSGraphicsContext* context = [NSGraphicsContext currentContext];

	[mCanvas drawRect:rect inContext:context];

	// If we don't have a selection, bail now
	if ( mSelection == nil )
		return;
We just draw the contents of the canvas. If we don’t have a selection, we can stop right here (but that wouldn’t be very interesting, now would it?).
The first thing we need to do is convert our selection mask into something Core Image can use:
	// Create a CIImage from our selection image. It's important that our mSelection
	//	has to be an actual image, not an image mask as created by CGImageMaskCreate.
	//	CIImage will not create the proper image with a CGImageRef created with
	//	CGImageMaskCreate.
	CIImage *selectionImage = [CIImage imageWithCGImage:mSelection];

	// The first thing we want to do is edge detection. We make the assumption
	//	that our mask has only two colors: black and white. If we were to do
	//	some antialiasing in it, we might have to do some posterization to
	//	reduce the number of colors before running the edges filter.
	CIFilter* edgesFilter = [CIFilter filterWithName:@"CIEdges"];
	[edgesFilter setDefaults];
	[edgesFilter setValue:selectionImage forKey:@"inputImage"];

	// In order to use our mask, convert it into an alpha channel
	CIFilter* maskToAlphaFilter = [CIFilter filterWithName:@"CIMaskToAlpha"];
	[maskToAlphaFilter setDefaults];
	[maskToAlphaFilter setValue:[edgesFilter valueForKey:@"outputImage"] forKey:@"inputImage"];
We also go ahead and do an edge detection on our mask. Since we know that our mask only ever has two colors, we don’t need to do any posterization on it beforehand. In a real system, we might have antialiasing, and might need to reduce the number of colors with posterization. We then convert our new mask into an alpha channel so we can use it in a compositing filter later.
To illustrate this, suppose our selection is this:
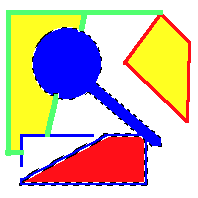
our image mask would then be:

After we apply the edges filter to our mask, it would be:

As you can see the mask is now white where we want our marching ants to appear. Applying the mask to alpha filter then means it has an alpha of 1.0 (opaque) where it is white, and an alpha of 0.0 (transparent) where it is black.
Now that we have our mask, we need to generate our stripes that we’re going to use for the ants:
	// Generate vertical black and white stripes that are 4 pixels wide.
	//	We animate the marching ants here by shifting the y axis to the right
	//	each time through.
	CIFilter* stripesFilter = [CIFilter filterWithName:@"CIStripesGenerator"];
	[stripesFilter setDefaults];
	[stripesFilter setValue: [CIColor colorWithRed:0.0 green:0.0 blue:0.0 alpha:1.0] forKey:@"inputColor0"];
	[stripesFilter setValue: [CIColor colorWithRed:1.0 green:1.0 blue:1.0 alpha:1.0] forKey:@"inputColor1"];
	[stripesFilter setValue: [NSNumber numberWithFloat:4.0] forKey:@"inputWidth"];
	[stripesFilter setValue: [CIVector vectorWithX:mPhase Y:150.0] forKey:@"inputCenter"];
We use the CIStripesGenerator to create some vertical black and white alternating lines. We set the width to four simply because that was the line dash width we used in the original marching ants algorithm. However, because of the next step, the line segments won’t exactly be four pixels wide everywhere.
We also implement the animation of the marching ants here. One of the parameters of the stripes filter is where the center of the generated lines are. By incrementing the x value of the center point, we shift the vertical lines to the right each time through the animation, which makes the ants “march.”
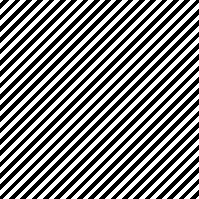
Our initial stripes filter image would look like this:

In order to get our stripes to show up on all edges of a selection correctly, we need to tilt the stripes in one direction:
	// We have vertical stripes, which will look good on the top and bottom edges of
	//	the selection, but will appear as a solid colored line on the left and right.
	//	So that most border shapes will appear dashed, rotate the vertical lines
	//	by 45 degrees.
	CIFilter *affineTransform = [CIFilter filterWithName:@"CIAffineTransform"];
	NSAffineTransform *rotateTransform = [NSAffineTransform transform];
	[rotateTransform rotateByDegrees:-45];
	[affineTransform setDefaults];
	[affineTransform setValue:[stripesFilter valueForKey:@"outputImage"] forKey:@"inputImage"];
	[affineTransform setValue:rotateTransform forKey:@"inputTransform"];
The problem with leaving the stripes vertical is that they wouldn’t look right on the vertical edges of the selection. The top and bottom edges of the selection would nicely alternate between black and white, but the left and right edges would be one solid color.
To fix this we apply an affine transform to rotate the lines 45 degrees. Our stripes now look like:
We now have our two parts: the stripes that will be our ants, and the mask that marks where they should go. We only need to combine them:
	// The last filter we apply combines our newly created stripes with our mask.
	CIFilter *multiplyFilter = [CIFilter filterWithName:@"CIMultiplyCompositing"];
	[multiplyFilter setDefaults];
	[multiplyFilter setValue:[maskToAlphaFilter valueForKey:@"outputImage"] forKey:@"inputImage"];
	[multiplyFilter setValue:[affineTransform valueForKey:@"outputImage"] forKey:@"inputBackgroundImage"];

	// Finally, render our creation to the view.
	CIContext *ciContext = [context CIContext];
	CGRect imageRect = CGRectMake(0, 0, CGImageGetWidth(mSelection), CGImageGetHeight(mSelection));
	[ciContext drawImage:[multiplyFilter valueForKey:@"outputImage"] inRect:imageRect fromRect:imageRect];
We use the multiply compositing filter to combine the images. This works because our edge mask’s alpha is 1.0 at the edges and 0.0 everywhere else. When you multiply the alpha channels of the two images together, it filters out everything but the edges, thus giving us ants around the selection.
Since we now have our fully formed ants, we render them to the screen using a CIContext created from our NSGraphicsContext.
Just for completeness, here’s the last bit of the drawRect fuction:
	// The marching ants need to animate, so fire off a timer half a second later.
	//	It will update the mPhase member and then invalidate the view so
	//	it will redraw.
	[NSTimer scheduledTimerWithTimeInterval:0.5 target:self selector:@selector(onSelectionTimer:) userInfo:nil repeats:NO];
}
Nothing new here: we just fire off a timer that will increment the phase member and invalidate the view so the ants march.
That’s it, we’re done. Much less involved for us than the previous algorithm.
Conclusion
Once again, I’d like to thank Will Thimbleby for suggesting this approach. I have to admit: I think using a NSBezierPath to render the ants looks better. However for sufficiently complex or large image masks, it may be prohibitively expensive to use.