Archive for January, 2007

Image Filter Theatre: HSB Mixer

For my next trick Rocky, I’m gonna pull a rabbit outta my hat. Or maybe just a HSB mixer.

I’m going to build off what I learned from my previous Core Image example, this time adding user parameters, demonstrating how to build functions in the Core Image Kernel Language, and other exciting magic tricks.

This filter is going to simply allow the user to make adjustments to the image in the HSB color space. So I probably need to come up with a few definitions as to what HSB color space is.

HSB Color Space

HSB, aka HSV, is a color space that defines color by three components: hue, saturation, and brightness (sometimes called value). Hue describes the color type (e.g. red, green, blue, etc) and is measured in degrees, from 0 to 360. Saturation is the vibrancy of the color, typically measured from 0 to 100. The less saturation, the more gray a color appears. The value, or brightness of a color, is essentially what it sounds like, and typically ranges from 0 to 100.

The HSB color space is a cone, with the hue running the circumference of the base, saturation running from the center to the edge of the cone, and brightness running the height of the cone. It made a lot more sense to me when I looked a few models, which can be found at Wikipedia’s entry on the HSV color space.

Project and Resources

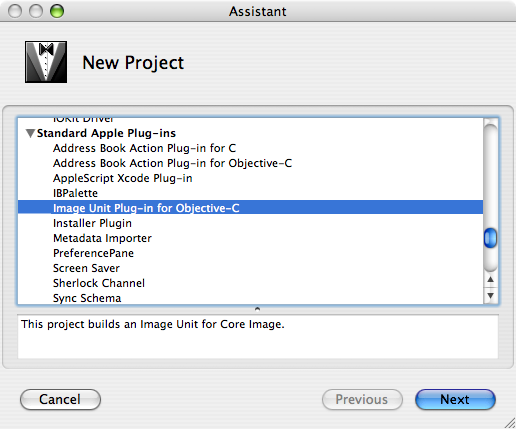
Like last time, I want to create a project from the “Image Unit Plug-in for Objective-C” template. I’ve named mine “HSB Mixer.”

Next, I need to modify the Description.plist file to tell Core Image about the parameters my filter has, and what category my filter belongs to, which effects where it shows up in the UI.

Under the CIAttributeFilterCategories key in the plist, I find the different default categories HSB Mixer belongs to. Although the HSB Mixer will work with both video and still images, it’s not really a “stylize” filter, but more of a color adjustment. To that end, I change CICategoryStylize to CICategoryColorAdjustment:

<key>CIAttributeFilterCategories</key>
<array>
<string>CICategoryColorAdjustment</string>
<string>CICategoryVideo</string>
<string>CICategoryStillImage</string>
</array>

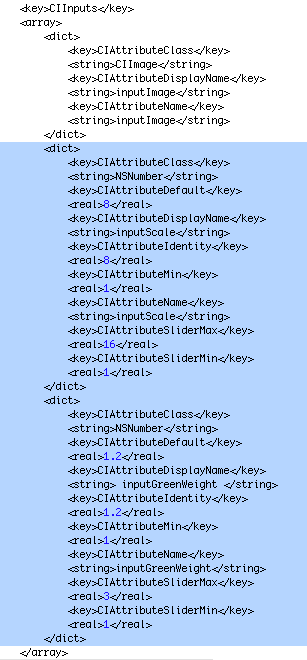
Now I need to add my parameters. By default, the image to modify is the first parameter, followed by two number parameters. Since this isn’t a generation filter, I need the image parameter, but instead of the two default number parameters, I need three number parameters for hue, saturation, and brightness. So I delete the last two parameters (the last two dict elements) under the CIInputs key.

The first parameter that I add is hue:

<dict>
<key>CIAttributeClass</key>
<string>NSNumber</string>
<key>CIAttributeDefault</key>
<real>0</real>
<key>CIAttributeDisplayName</key>
<string>inputHue</string>
<key>CIAttributeIdentity</key>
<real>0</real>
<key>CIAttributeName</key>
<string>inputHue</string>
<key>CIAttributeSliderMax</key>
<real>6</real>
<key>CIAttributeSliderMin</key>
<real>-6</real>
</dict>

The first key is CIAttributeClass, and it simply states the corresponding Cocoa class to use for the given parameter. All the possible values can be found in the document Modify the Description Property List in Table 4-2.

The CIAttributeDefault key describes the default value of the parameter in the UI. I choose 0 as the default value, because it is also the identity value (see below).

CIAttributeDisplayName is a key into the Description.strings file, and determines the localized name that is shown to the user.

The CIAttributeIdentity key specifies a value for the parameter which produces the identity of the input image. i.e. It’s a value such that the filter doesn’t change the source image in any way. In this case, a value of zero means the filter doesn’t change the hue of the image.

CIAttributeName is an internal name for the parameter. Core Image Filters are “Live Effects” in Fireworks parlance, meaning they store their parameters so they can be modified later, and they don’t modify the source image directly. Instead, they generate a new image based on the source image plus the filter parameters. In other words, they’re editable. To that end, each of the parameters I define need to be stored in an NSDictionary, and CIAttributeName is simply the key for each parameter in that dictionary.

CIAttributeSliderMin and CIAttributeSliderMax define the range of the slider control used to represent the parameter. Although hue ranges from 0 to 360 degrees, I’m going to scale it down to 0 to 6, using real numbers. Since I want to be able to both add and subtract from the hue, so all values are achievable, I let the range be -6 to 6.

The parameters for saturation and value are the same as hue, except they range from -1 to 1, and obviously have different names:

<dict>
<key>CIAttributeClass</key>
<string>NSNumber</string>
<key>CIAttributeDefault</key>
<real>0</real>
<key>CIAttributeDisplayName</key>
<string>inputSaturation</string>
<key>CIAttributeIdentity</key>
<real>0</real>
<key>CIAttributeName</key>
<string>inputSaturation</string>
<key>CIAttributeSliderMax</key>
<real>1</real>
<key>CIAttributeSliderMin</key>
<real>-1</real>
</dict>
<dict>
<key>CIAttributeClass</key>
<string>NSNumber</string>
<key>CIAttributeDefault</key>
<real>0</real>
<key>CIAttributeDisplayName</key>
<string>inputValue</string>
<key>CIAttributeIdentity</key>
<real>0</real>
<key>CIAttributeName</key>
<string>inputValue</string>
<key>CIAttributeSliderMax</key>
<real>1</real>
<key>CIAttributeSliderMin</key>
<real>-1</real>
</dict>

Finally, we need to modify Description.strings to have localized versions of our parameter display names:

"MyKernelFilter" = "HSB Mixer";
"inputHue" = "Hue";
"inputSaturation" = "Saturation";
"inputValue" = "Brightness";

Kernel Code

The algorithm for the kernel is simple:

  1. Sample the current pixel
  2. Convert the current pixel from RGB to HSV
  3. Add the hue, saturation, and value input parameters to the corresponding component in the current HSV pixel
  4. Convert the adjusted HSV pixel back to RGB
  5. Return the new RGB pixel

The kernel function is defined as:

kernel vec4 hueSaturationKernel(sampler image, float inputHue, float inputSaturation, float inputValue)
{
// Get source pixel
vec4 p = sample(image, samplerCoord(image));

// Convert to HSV color space
vec4 hsvPixel = rgbToHsv(p);

// Add on our values (but be sure to clip)
hsvPixel.r = clamp(hsvPixel.r + inputHue, 0.0, 6.0);
hsvPixel.g = clamp(hsvPixel.g + inputSaturation, 0.0, 1.0);
hsvPixel.b = clamp(hsvPixel.b + inputValue, 0.0, 1.0);

// Convert back to RGB color space
return hsvToRgb(hsvPixel);
}

Note that my user parameters are just passed in, in the order I declared them in Description.plist. The kernel function itself is pretty straightforward. rgbToHsv() and hsvToRgb() are the only user defined functions, and they convert to the HSV color space and back. Notice that the vec4 data type always assumes rgba, so when you see hsvPixel.r here, it actually corresponds to the hue. Similarly hsvPixel.g corresponds to saturation and hsvPixel.b corresponds to value, although the alpha channel remains untouched.

The tricky part is dealing with HSV to RGB and RGB to HSV conversions. There is code all over the place to deal with this, but I used the C code from an ACM paper as a template. The algorithm there scales the hue down to be from 0 to 6, which is why my input parameters do as well. I won’t go into the math behind the conversions here, because it is covered in any graphics textbook, as well as several places on the web, including Wikipedia.

The easier of the conversions, code wise, is RGB to HSV:

vec4 rgbToHsv(vec4 rgb)
{
float x = min(rgb.r, min(rgb.g, rgb.b));
float v = max(rgb.r, max(rgb.g, rgb.b));
float f = (rgb.r == x) ? rgb.g - rgb.b : ((rgb.g == x) ? rgb.b - rgb.r : rgb.r - rgb.g);
float i = (rgb.r == x) ? 3.0 : ((rgb.g == x) ? 5.0 : 1.0);
float h = i - (f / (v - x));
float s = (v - x) / v;

return (v == x) ? vec4(-1, 0, v, rgb.a) : vec4(h, s, v, rgb.a);
}

Just about everything in this function is straightforward. min() and max() are built in functions that will work on any numerical type.

You might notice that there is potentially wasted computation here, in the special case of v == x. In that case, I just return v, meaning I didn’t need to compute f, i, h, or s. The reason for this is that the Core Image Kernel Language doesn’t support if statements that are data dependent. That is, the expression inside of an if statement can only contain a constant.

Correct:

if ( true ) v = x;
if ( false ) x = v;

Incorrect:

if ( v == x ) v = x; // Error!
bool val = true;
if ( val ) x = v; // Error!

The kernel language does however allow use of the ternary operator, so that’s what I’m forced to use here. The side effect of that is that I cannot return early, even if all the relevant calculations are complete. I’m guessing the reason for this restriction is related to the abilities of most GPU’s.

The HSV to RGB conversion is sightly more complicated:

vec4 hsvToRgb(vec4 hsv)
{
float h = hsv.r;
float s = hsv.g;
float v = hsv.b;
int i = int(floor(h));
float f = isOdd(i) ? h - float(i) : 1.0 - (h - float(i));
float m = v * (1.0 - s);
float n = v * (1.0 - s * f);
vec4 result = (i == 0) ? vec4(v, n, m, hsv.a) : ((i == 1) ? vec4(n, v, m, hsv.a) : ((i == 2) ? vec4(m, v, n, hsv.a) : ((i == 3) ? vec4(m, n, v, hsv.a) : ((i == 4) ? vec4(n, m, v, hsv.a) : ((i == 5) ? vec4(v, m, n, hsv.a) : vec4(v, n, m, hsv.a))))));

return (h == -1.0) ? vec4(v, v, v, hsv.a) : result;
}

The first thing to note is that all type conversions must be explicit. To get i I call floor(), a built in function, on h, then explicitly cast it to an int. I’m not sure of design decisions made here, but I would hazard to guess that float to int conversions, and vice versa, are expensive.

The only other thing to note here is the last user defined function, isOdd():

bool isOdd(int v)
{
float dividend = float(v) / 2.0;
return dividend != floor(dividend);
}

I call attention to this function because of its technique. Usually, to determine if a number is odd, I bitwise AND against a bitmask of 0×0001, or take the modulus by 2 and see if it has a remainder. However, the kernel language does not support any bitwise operators or modulus. Here, I divide by two and see if has fractional part by comparing the dividend against the floor of itself. This is error prone because of rounding errors. Another way would be to take the difference between the dividend and its floor, and see if it is greater than a specified small number.

Trying it out

Flower run through HSB Mixer

Like before, I like using the Core Image Fun House for experimenting with my filters. I just need to copy my built filter to ~/Library/Graphics/Image Units/ to do that.

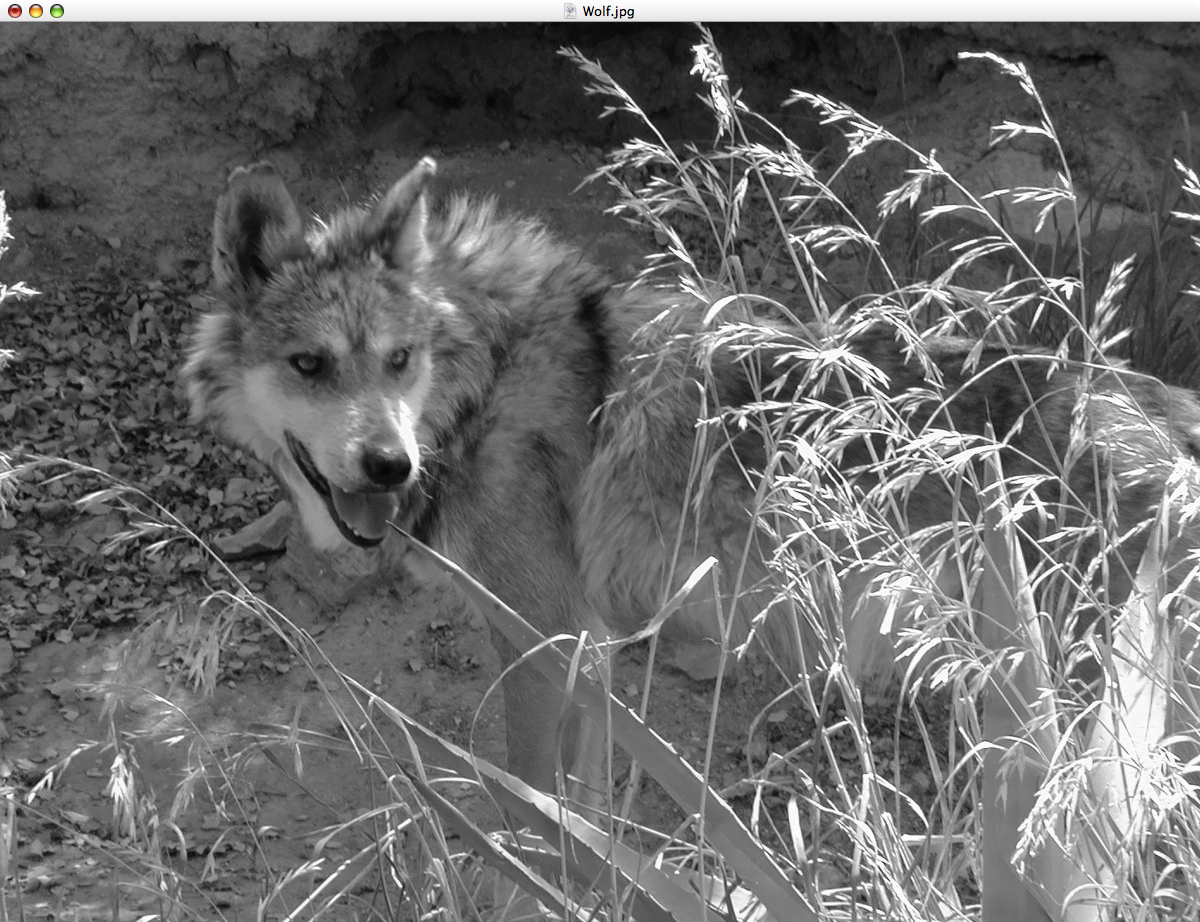
Here’s Flowers.jpg with the HSB Mixer applied to it. The parameters are Hue: 2.0, Saturation: -0.48, Brightness: 0.0.

Conclusion

Hopefully you’ve learned more about Core Image Filters from this post. We’ve learned that simply declaring input parameters in a plist file, Core Image clients can automatically construct UI for your filter. Also, we’ve learned that although the kernel language is powerful, it has some serious limitations that we have to work around.

Download HSB Mixer Source Code

Grayscale for the Greater Good

Ever since I worked on the greatest web graphics program ever, that’d be Fireworks for the uninitiated, I’ve been intrigued by Ted Turner’s idea of colorizing old movies, and image filters.

It wasn’t until the Fireworks 8 cycle that I really got a chance to start playing with image filters. I wrote several, but because I was pulled off Fireworks just a few months into Fireworks 8, only a couple of them actually made it into the final product. That didn’t end my interest in filters, but it did end my chance of publishing them.

I’ve also come to the conclusion that Ted Turner got it backwards. Instead of colorizing old movies, he should have been making all the new movies grayscale. As any artist can tell you, making images and/or movies black and white automatically makes them artsy. At least, that’s what all the artists I just made up in my head say.

The epiphany came today when I realized I should combine these two ideas, and create a filter that removes color. Well, that and show how to write Core Image filters. That might be interesting too.

Creating a project

New Image Plug-in

I want to create a standalone Image Unit Plug-in. Fortunately, Xcode has a template just for that. To get this artistic revolution started, I select File > New Project… from Xcode’s menu. From here, I pick the “Image Unit Plug-in for Objective-C” template.

Next, I name my project “Grayscale,” because that’s what the plugin will do, and because I’m not a crazy Brit who insists on spelling gray with an “e.” The way they prattle on about it, you’d think they’d invented the language or something.

Modifying the description

Now that I have a project, the first thing I want to do is modify the description property list. The Description.plist is what tells Core Image what the parameters for the filter are, the category of the filter, and where to find the kernel, which, surprisingly, isn’t always at KFC.

In order to find my filter later to use it, I need to give it a meaningful category. Apple has several predefined categories that I have to choose from, thus cramping my artistic style. Despite this, I can still improve on the default choice of CICategoryStylize, by changing it to CICategoryColorEffect.

After my change, the Description.plist category section looks like this:

<key>CIAttributeFilterCategories</key>
<array>
<string>CICategoryColorEffect</string>
<string>CICategoryVideo</string>
<string>CICategoryStillImage</string>
</array>

Description.plist Filter Parameters

The most important thing to modify the in Description.plist is the description of the filter’s parameters. It turns out that I don’t need any input parameters for this colorless revolution, with the exception of the source image. The default Description.plist comes with three parameters, so I’ll delete the last two parameters.

That concludes everything I need to do with Description.plist. However, I still need to change the display name that shows up in the UI for my filter. For that I open up Description.strings:

"MyKernelFilter" = "Demo CIKernel Only Filter";
"inputScale" = "Scale";
"inputGreenWeight" = "Green Weight";

Since I don’t have any user inputs, I can ditch the two last strings, inputScale and inputGreenWeight. MyKernelFilter is the name of my filter, so I’ll change it to “Grayscale.”

"MyKernelFilter" = "Grayscale";

That does it for all the meta-information for my filter plug-in.

Kernel

Now that I’ve set up all the resources for my filter, I need to write the actual code. The kernel code is written in what is called Core Image Kernel Language, which is a subset of the OpenGL Shading Language.

To start, I open up MyKernelFilter.cikernel, and delete it’s current contents. In its place, I add the following code:

kernel vec4 grayscaleKernel(sampler image)
{
// Get source pixel
vec4 p = sample(image, samplerCoord(image));

// Calculate the intensity
float intensity = clamp(0.3* p.r + 0.59* p.g + 0.11* p.b, 0.0, 1.0);

// Set the destination pixel based on intensity
return vec4(intensity, intensity, intensity, p.a);
}

It doesn’t really matter what I name the function, as long as it is tagged with the kernel keyword. The kernel, in this case, acts as a map from the source pixel value, to the destination pixel value. You’ll note that it returns a vector of four elements (Red/Green/Blue/Alpha) and takes the source image as the only parameter. If I had other parameters, they would come after the image parameter, just like in the Description.plist file.

The first line simply retrieves the pixel from the source image:

vec4 p = sample(image, samplerCoord(image));

As established earlier, image is the source image passed in as a parameter. samplerCoord() returns the coordinates of the source pixel inside the source image. sample() does what it says, and will return a single pixel value given an image and coordinates.

The second line calculates the intensity of the source pixel:

float intensity = clamp(0.3* p.r + 0.59* p.g + 0.11* p.b, 0.0, 1.0);

To do this I add the weighted RGB components together. The reason behind the weights goes beyond what I want to cover here, but I use intensity calculation from the YIQ color model. For safety reasons I clamp the value to between 0 and 1, because each color component has to stay in that range.

Finally, I return the value of the destination pixel:

return vec4(intensity, intensity, intensity, p.a);

I’m simply setting each of the RGB components to the intensity, which will make the color a shade of gray. Also note that I’m leaving the alpha channel alone.

That’s it as far as the coding goes. I just need to select Build > Build from the menu to complete my filter.

Making cone cells obsolete

Before I can do anything with my Grayscale filter, I need to install it. Core Image looks in a couple of different places, but the easiest folder to stick it in is: ~/Library/Graphics/Image Units/.

Gray wolf

Although I could use Quartz Composer to try out my filter, I like the Core Image Fun House, because it’s simpler and more to the point. It can be found at /Developer/Applications/Graphics Tools/. When I open the Fun House, I’m prompted to pick a source image. I usually pick the Wolf.jpg, whom I’ve nicknamed “Rentzsch”, for reasons that escape me.

After picking an image, I click the plus button, and pick my Grayscale filter from under the Color Effect category.

And there you have it. A very artistic, extraordinary, gray wolf, of whom there are none like. Hmmm… maybe I should have created a green filter.

Conclusion

Although I avoided Quartz Composer for this simple example, it is pretty much required for any filter of sufficient complexity. When building, Xcode doesn’t actually compile the kernel or do any type of checking. As far as I can tell, only the Core Image Kernel tool in Quartz Composer will do checking. Unfortunately, Quartz Composer doesn’t allow me to inspect variables or step through statements. It only does basic syntax and type checking.

Also, the shading language, especially with Apple’s restrictions, is pretty limiting. Even with simple kernels, I struggled to get them to work with the kernel language.

Despite the restrictions, I’m having a lot of fun playing around with Core Image kernels. I’ve written a few others that I may, at some point in the future, show off here. Until then, have fun viewing the world through the eyes of a dog.

Download Grayscale Core Image Filter

Fun and Games with Glyphs

There comes a time in a man’s life when he must write about glyphs. This is that time.

…but I don’t need a pyramid

Glyphs are essentially pictures. They’re are a lot like hieroglyphs, except with less hiero, and they don’t necessarily involve Egyptians or slave labor. Glyphs are drawn on the screen to represent a character or group of characters. They can also be special symbols, such as the clover used for the command key. Before a string is drawn to the screen, the characters are first converted to glyphs, then the glyphs are drawn to the screen.

Although it’s rarely necessary to drop down to the glyph level, let’s be honest: who doesn’t want a chance to play around with glyphs? After all, all the cool pharaohs are doing it.

Obtaining a glyph

Before you can do anything with a glyph, you have to get one, just like before you can use a pyramid, someone has to be dead, preferably a mummy.

If you just have plain text, getting the glyphs is pretty easy. You just use NSLayoutManager:


NSTextStorage* storage = [[[NSTextStorage alloc] initWithString:string] autorelease];
NSLayoutManager* layout = [[[NSLayoutManager alloc] init] autorelease];
[layout setTextStorage:storage];

unsigned i = 0;
for (i = 0; i < [layout numberOfGlyphs]; ++i) {
NSGlyph glyph = [layout glyphAtIndex:i];

// ... do something with the glyph...
}

string, as passed in to the NSTextStorage object, is the string you want glyphs for.

As I mentioned earlier you can also have glyphs that are special symbols. Typically, these are font specific, and are named. For example, the command key glyph is in the special .Keyboard font, and is named “propellor.” It only takes a couple of lines to get ahold of it:


NSFont* font = [NSFont fontWithName:@".Keyboard" size:13];
NSGlyph glyph = [font glyphWithName:@"propellor"];

I should note that NSGlyph is just an unsigned integer.

Wasn’t that fun? Sure it’s not a large, geometrically shaped, timeless monument in your honor, but what did you want from a blog?

Draw like an Egyptian

Glyphs aren’t that much use unless you can draw them. As the pyramids show, things are the easiest when you make someone else do all the hard work. To that end, the easiest way to draw a glyph is to take advantage of NSAttributedString.

First, I’m going to assume I already have the font and glyph, retrieved from the previous example.

Second, I need to build up a glyph info (NSGlyphInfo) object. Since glyphs are often specific to fonts, I have to include the font as well as the glyph code. What’s not completely obvious is what the “base string” is for. It is essentially a placeholder string, that will be replaced by the specified glyph when it is drawn.

The following code shows how to create a glyph info object for the command key glyph.


NSString* baseString = [NSString stringWithFormat:@"%C", 0xFFFD];
NSGlyphInfo* glyphInfo = [NSGlyphInfo glyphInfoWithGlyph:glyph forFont:font baseString: baseString];

You might be wondering why I chose the 0xFFFD character for a base string. Much like the pyramids, it’s a mystery to me. Some glyphs (like those in the Apple Symbols font) will draw with just about any base string you give it. However, other glyphs, like those in .Keyboard, only draw if you give them a specific base string.

I discovered the 0xFFFD value by dropping in a NSTextView in Interface Builder, running the app, and dropping in a bunch of glyphs using the Character Palette Input Method. Then I called textStorage on the NSTextView (which returns a subclass of NSAttributedString) and dumped out the NSAttributedString.

Now that I have a glyph info object, I can create my NSAttributedString. I just need to specify attributes for the font, NSFontAttributeName, and the glyph itself, via NSGlyphInfoAttributeName.


NSDictionary* attributes = [NSDictionary dictionaryWithObjectsAndKeys: font, NSFontAttributeName, glyphInfo, NSGlyphInfoAttributeName, nil];
NSAttributedString* string = [[NSAttributedString alloc] initWithString: baseString attributes:attributes];

Notice that for the string, I just provide the base string. I could include regular text, which could contain multiple instances of the base string. Each instance of the base string would be replaced by the glyph when drawn.

Now that I have a NSAttributedString, there a couple of things I can do with it. If I have a control of some sort, like, say, a NSTextField, I can just call setAttributedStringValue: and pass in my attributed string, and the control will take care of drawing it. Otherwise, I can take a more direct approach, and call drawAtPoint: or drawInRect: on the NSAttributedString.

If using NSAttributedString isn’t low level enough for you, then you’re a control freak and should seriously seek professional help. But before you go, first consider NSBezierPath.

In this example, let’s assume font is a NSFont that contains all the glyphs I want to use. Also, assume glyphs is an NSArray of NSNumbers containing the glyph codes I want to draw. Note that this means the sample code will only work if all glyphs are from the same font.


NSBezierPath* path = [NSBezierPath bezierPath];
float left = 0;

// First, generate a bezier path with our glyphs
unsigned count = [glyphs count];
unsigned i = 0;
for (i = 0; i < count; ++i) {
NSNumber* glyphNumber = [glyphs objectAtIndex:i];
NSGlyph glyph = [glyphNumber unsignedIntValue];

[path moveToPoint: NSMakePoint(left, -[font descender])];
[path appendBezierPathWithGlyph: glyph inFont: font];

NSSize advancement = [font advancementForGlyph: glyph];
left += advancement.width;
}
[[NSColor blackColor] set];
[path fill];

Since glyphs are font specific, I have to ask the font for glyph measurements, in order to place the glyphs properly.

More interestingly, note that since I have a NSBezierPath, I can do any sort of graphic transform or translation on the glyphs. I can rotate them, change their color, or do my own kerning. If you’re writing your own graphics program, handling text at the glyph level, using NSBezierPaths, is very useful.

Beating a dead mummy

Hopefully this post has given you many insights into what you can do glyphs. Namely, build pyramids. Or attributed strings. Whatever.