Archive for July, 2011

How to implement boolean operations on bezier paths, Part 3

Previously, I covered how to find the intersections between two bezier curves and gave a conceptual overview of how to perform boolean operations on bezier paths. In this final installment I’ll present the algorithm used to implement the boolean operations.

Overview

The algorithm that I show here is based on the algorithm presented in “Efficient clipping of arbitrary polygons” by Günther Greiner and Kai Hormann. My algorithm is adapted to work on closed bezier paths (instead of polygons), handle nonintersecting (sub)paths, and handle intersections between fill paths and hole paths.

As before the full source code is available on Bitbucket, and it’s licensed under the MIT license. If you want to follow along, the majority of the algorithms described are implemented in the FBBezierGraph class.

Data Structures

My algorithm, like Greiner-Hormann’s, uses several data structures. The primary is FBBezierGraph. Think of FBBezierGraph as an expanded version of NSBezierPath that can be annotated with where intersections happen. FBBezierGraph contains FBBezierContours, which are just closed subpaths. Anytime I see a moveto in a NSBezierPath, that’s a new contour. FBBezierContours in turn contain FBContourEdges, which are mainly wrappers around a FBBezierCurve. They represent one cubic bezier curve, and can also hold FBEdgeCrossings. Each FBEdgeCrossing represents a location where another edge crosses this edge.

By breaking a NSBezierPath out into all these separate structures, it makes it easier to process. Contours need to be dealt with one at a time, and I need a way to keep track of where the intersections happen. The basic flow is to convert my NSBezierPath into a FBBezierGraph, perform the boolean operation, then convert it back to a NSBezierPath. FBBezierGraph handles both sides of the conversion.

Basic Algorithm

The basic algorithm for union, intersect, and difference are very similar. In fact, there’s only one step that’s all that different between the three. The basic steps are:

  1. Find all the intersections where the edges actually cross, and insert FBEdgeCrossings into both FBBezierGraphs at those locations.

  2. Handle all the intersecting contours.

    • Walk each contour and mark the entry and exit into the section I want to output to the final result.

    • Walk each contour and output the final contours by following the entry and exit directions marked in the previous step.

  3. Handle all the nonintersecting contours.

Step three is the only step that is very different between the operations. Step two is identical except for if we mark the inside or outside section.

The above algorithm only applies to union, intersect, and difference. On the other hand, the entire implementation for exclusive or is:

- (FBBezierGraph *) xorWithBezierGraph:(FBBezierGraph *)graph
{
    FBBezierGraph *allParts = [self unionWithBezierGraph:graph];
    FBBezierGraph *intersectingParts = [self intersectWithBezierGraph:graph];
    return [allParts differenceWithBezierGraph:intersectingParts];
}

As I’ve mentioned previously, exclusive or is implemented in terms of union, intersect and difference. I’ll now ignore exclusive or for the rest of the post.

Finding Crossings

For all three operations I start the same way: finding all the intersections where the edges cross. I do this by simply walking each edge of the subject bezier graph and intersecting them with the edges of the clipping graph. I don’t look for self intersections. I insert a FBEdgeCrossing into each bezier graph for each intersection, and point the crossings at each other so I can easily jump between graphs at crossings. You can find the code for this in the insertCrossingsWithBezierGraph: method.

There are a couple of things I have to look out for when determining if two edges actually cross at an intersection. One possibility is that the two edges are tangent at the intersection, and don’t cross. That is straightforward to detect; I compute the tangent for both curves at the intersection point, and see if they’re parallel. If they are, then they are tangent at that point.

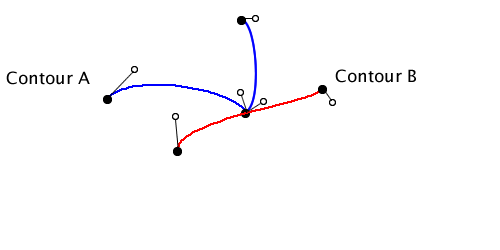
The more involved case is when the intersection happens at the end point of one or both of the edges. If an intersection happens in the interior of two curves, and it’s not tangent, then I know the edges actually cross. But suppose I encounter the following intersection:
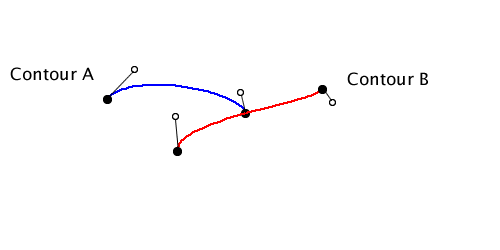
CrossingAtEnd

I don’t know if the two contours cross or not just by looking at these two edges alone. I need to look at the next edge. There are two basic possibilities:
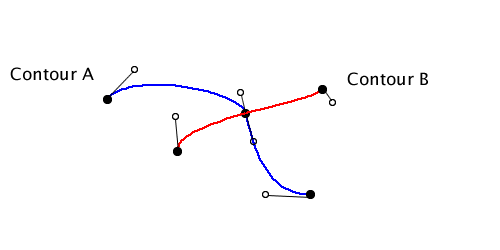
CrossingThatCross CrossingThatDontCross

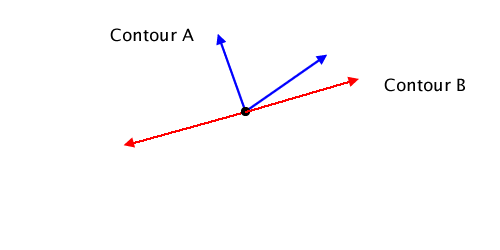
Either the contours cross at the intersection, or they don’t (I consider going coincident to be not crossing). I use the tangents at the intersection point to determine if the contours actually cross or not. The tangents for the above examples look something like:
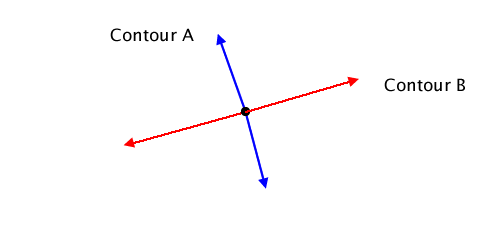
CrossingTangentsCross CrossingTangentsDontCross

I then compute the angles of the tangents by computing the polar coordinates. If the contours cross, the angles will cross as well. The method doesEdge:crossEdge:atIntersection: implements the crossing check.

When finding crossings I have to be wary of one additional problem caused by intersections at end points. Since the end of one edge is the start of the next, an intersection at the end point will be found on both edges, resulting in duplicate crossings. So when I’m done finding all the crossings, I’ll go through the crossings I found and remove the duplicates.

Intersecting Contours

I take the processing of intersecting contours in two steps: marking which sections (inside or outside) of each contour to output, and then creating a new bezier graph containing those sections. The code for doing this for all three boolean operations is:

    [self markCrossingsAsEntryOrExitWithBezierGraph:graph markInside:NO];
    [graph markCrossingsAsEntryOrExitWithBezierGraph:self markInside:NO];

    FBBezierGraph *result = [self bezierGraphFromIntersections];

This is the code from the union operation. The code for the intersect and difference operations are identical except for the values passed in to the markInside parameter. Intersect passes YES for both self and graph, while difference passes NO for self and YES for graph (marking the outside of self and inside of graph).

When I mark the crossings as entry or exit, I go one contour at a time and mark the entries and exits relative to the other contour crossing it:

- (void) markCrossingsAsEntryOrExitWithBezierGraph:(FBBezierGraph *)otherGraph markInside:(BOOL)markInside
{
    for (FBBezierContour *contour in self.contours) {
        NSArray *intersectingContours = contour.intersectingContours;
        for (FBBezierContour *otherContour in intersectingContours) {
            if ( otherContour.inside == FBContourInsideHole )
                [contour markCrossingsAsEntryOrExitWithContour:otherContour markInside:!markInside];
            else
                [contour markCrossingsAsEntryOrExitWithContour:otherContour markInside:markInside];
        }
    }
}

Above I check to see if the other contour I’m intersecting with is a hole or not. As I talked about in the previous post, if the other contour is a hole, then I want to mark the opposite section that I normally would for this operation.

The method markCrossingsAsEntryOrExitWithContour:markInside: does the actual marking of crossings as entry or exit. The pseudocode for marking entries and exists:

  1. I pick a point on the contour to start with.

  2. I determine if the point lies inside or outside the other contour, using the even odd rule.

  3. Using the markInside parameter and if the start point is inside or outside, I determine if the start point is in the section I want to output or not.

    1. If the start point is in the right section already, the next crossing will be an exit, so assign isNextCrossingAnEntry = NO.

    2. If the start point is not in the section I want to output, the next crossing will be an entry, so I assign isNextCrossingAnEntry = YES.

  4. For each crossing on the contour (starting with my start point and proceeding in order):

    1. Assign the crossing’s property isEntry = isNextCrossingAnEntry.

    2. Toggle the value of isNextCrossingAnEntry.

The only tricky part of this is choosing a good start point. I don’t want a start point that is ambiguous, like one that is on the other contour.

After I’m done marking all the crossings as entry or exit, I need to build the final contours. The algorithm for that is:

  1. While there are unprocessed crossings do:

    1. I find the first unprocessed crossing on the bezier graph.

    2. I create a new contour.

    3. While the current crossing hasn’t be processed do:

      1. If the crossing is an entry, I move forward through the contour adding the edges (or edge segment if there’s a crossing) until I encounter the next crossing.

      2. Else the crossing is an exit, and I move backwards through the contour, adding edges (or segments) until I encounter the next crossing.

      3. I switch to the other bezier graph by setting the current crossing to it’s counterpart.

    4. I add the new contour to the final bezier graph.

And now I’m done processing all the intersecting contours.

Nonintersecting Contours

The final part of a boolean operation is dealing with the nonintersecting contours. This is where the various boolean operations differ the most. I start with the list of contours that don’t intersect anything.

For the union operation, I start out optimistically and assume they’ll all end up in the final result. I then walk both bezier graph’s nonintersecting contours and see if an individual contour is inside (as defined by the even odd rule) the opposite bezier graph. If it is, I know it’s redundant and I remove it from the final contours.

The code looks something like:

    for (FBBezierContour *ourContour in ourNonintersectingContours) {
        if ( [graph containsContour:ourContour] )
            [finalNonintersectingContours removeObject:ourContour];
    }
    for (FBBezierContour *theirContour in theirNonintersectinContours) {
        if ( [self containsContour:theirContour] )
            [finalNonintersectingContours removeObject:theirContour];
    }

Intersect is more or less the opposite of union. I start by assuming none of the nonintersecting contours from either bezier graph will make it. I then walk all the nonintersecting contours and see if the opposite bezier graph contains them. If the opposite graph does, then there is overlap, and the overlap is the contour being contained.

A simplified version of the code for intersect is:

    for (FBBezierContour *ourContour in ourNonintersectingContours) {
        if ( graph containsContour:ourContour] )
            [finalNonintersectingContours addObject:ourContour];
    }
    for (FBBezierContour *theirContour in theirNonintersectinContours) {
        if ( [self containsContour:theirContour] )
            [finalNonintersectingContours addObject:theirContour];
    }

I start computing the difference for nonintersecting contours by assuming none will make it into the final result. I then walk the nonintersecting contours for the subject bezier graph. If they are not contained by (and thus not subtracted away) the clipping bezier graph, I add them to the final contours. Next I walk the nonintersecting contours for the clipping bezier graph. If they are contained by the subject bezier graph, that means they cut a hole in the subject, so I add them to final contours.

The code looks kind of like:

    for (FBBezierContour *ourContour in ourNonintersectingContours) {
        if ( ![graph containsContour:ourContour] )
            [finalNonintersectingContours addObject:ourContour];
    }
    for (FBBezierContour *theirContour in theirNonintersectinContours) {
        if ( [self containsContour:theirContour] )
            [finalNonintersectingContours addObject:theirContour]; // add it as a hole
    }

And with that I’m done. I have the final intersecting and nonintersecting contours and can convert the bezier graph back into a NSBezierPath.

Contour Containment Issues

In the previous section, I skipped over the implementation of the containsContour: method despite the fact it gave me fits in practice. In theory it should be easy to implement: I pick a point on the contour and use the even odd rule to see if the point is inside the other bezier graph or not. Unfortunately there are two situations which make it not as simple as I’d hoped.

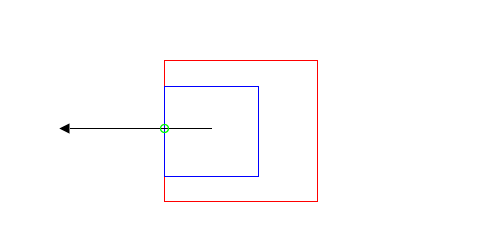
The first problem is easiest seen:
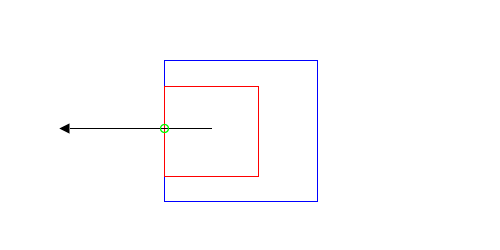
ContainmentInside ContainmentOutside

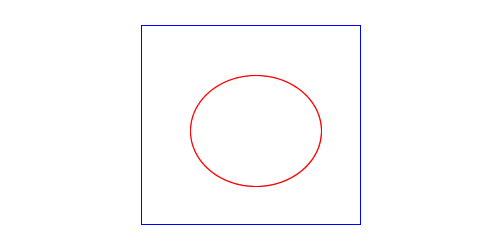
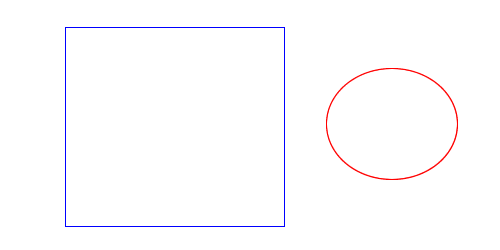
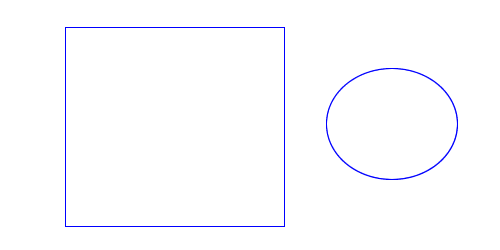
Does the blue contour contain the red? In both cases the even odd rule returns one intersection, indicating that it does. However, just by looking at it, I can tell that in the diagram on the right, it doesn’t. The problem is the ray passes through an edge where both contours coincide.

The second problem is show below:
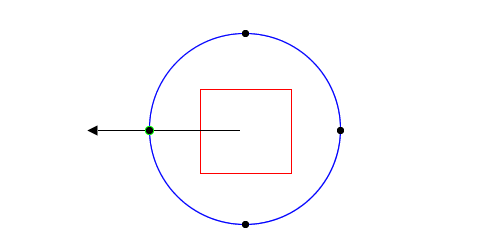
ContainmentSplit

This one is a bit more subtle. Notice that the ray I’m using to determine even or odd intersects where two edges meet. This means I’ll find two intersections (one for each edge) instead of just one, and I’ll think the red square is outside the blue circle.

My solution is somewhat brute force. I actually ended up casting a full line through the entire contour, instead of just one side, in order to increase my chances of getting a useful ray. I also alternate between horizontal and vertical lines, and I loop until I get a line that is unambiguous. There is more code dedicated to this operation that I like. There is probably a better way to do this.

Conclusion

I took on this project mainly for my own benefit, so I could learn how this works. But hopefully you’ve learned something useful too amidst all my struggling with this.

I have tried to test the sample code the best I could. You can check out all the test cases under the “Shapes” menu in the sample application. However, I’ve undoubtedly missed or left out edge cases which will cause the code to fail. If you decide to use this code in a commercial application: test, test, test. If you do find a case my code doesn’t handle, I’d like to hear about. That said, the code is provided as is, and I’m not guaranteeing any support for it.

How to implement boolean operations on bezier paths, Part 2

In my last post I showed how to find the intersection points between two bezier curves. While interesting, it’s merely a stop on the way to implementing boolean operations for bezier paths. This time I’ll show how to conceptually perform the four common boolean operations: union, intersect, difference, and exclusive or. I’ll cover the actual algorithms for implementing the four operations in the next post.

Conceptually Speaking

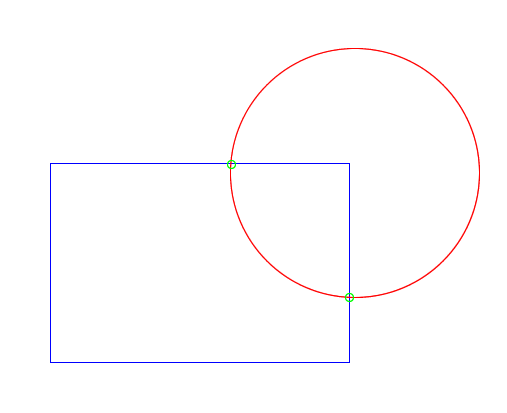
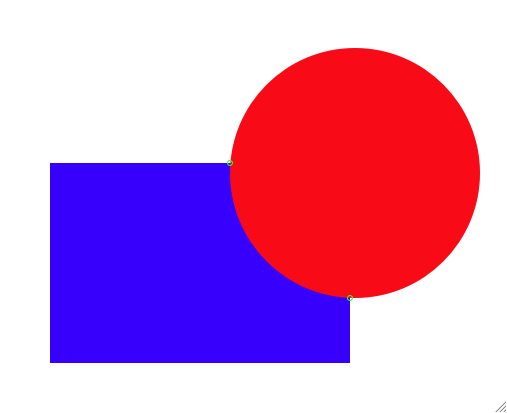
I think it’s helpful to start out with a simple case and see how this will work conceptually. I’ll start with the following example:

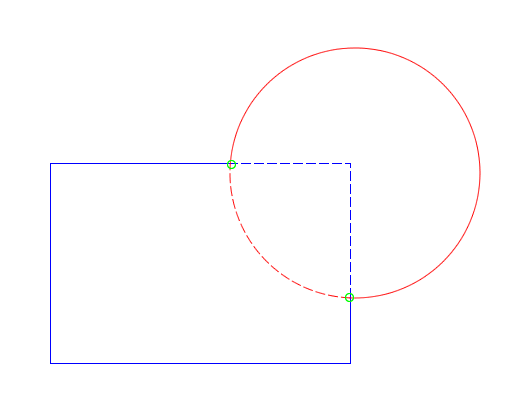
RectangleCircleIntersections

Here I have a rectangle and circle overlapping. The intersections have already been calculated and circled in green. Now I consider the shapes as wireframes:

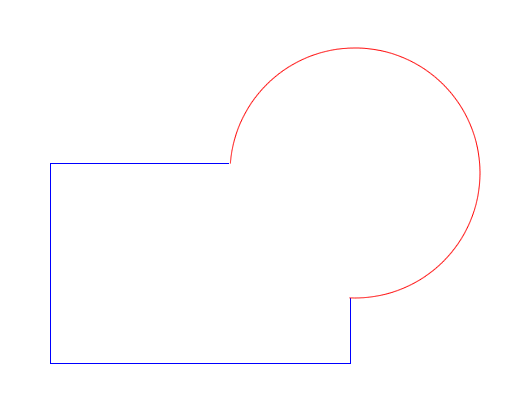
RectangleCircleWireframe

In my head, I divide up each path into sections based on the intersection points. There are two kinds of sections: one that is outside the other path, and one that is inside the other path. Performing a boolean operation is just a matter of picking the correct section from each path.

WireframeSections

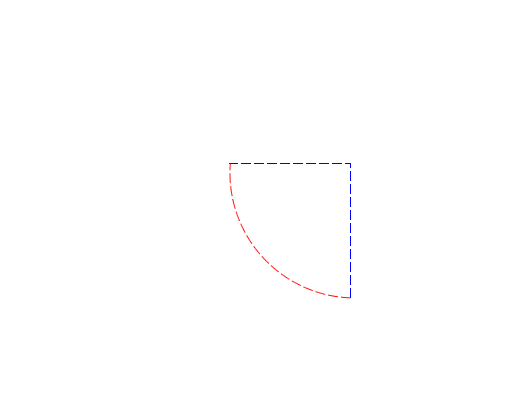
Here I’ve used a dashed style to mark which parts of the path are inside of the other path. Once I’ve separated the paths into the inside and outside parts, it’s easy to perform the boolean operations conceptually.

A union is a logical or, so I want all the outside sections:

WireframeUnion

The intersect operation is a logical and, so I just want the inside sections:

WireframeIntersect

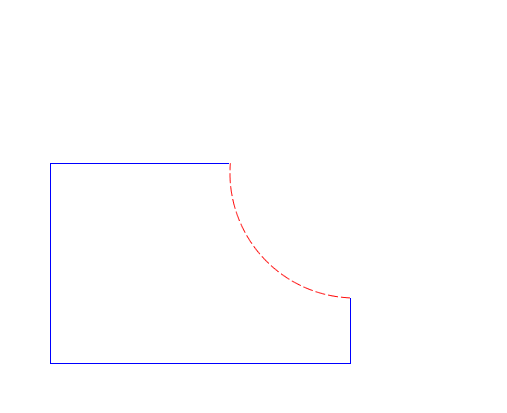
Difference is where I take a path and remove the parts that intersect with the other path. For that I want the outside sections of the subject (the rectangle), and the inside sections of the clip (the circle):

WireframeSubtract

For now I’m going to ignore logical exclusive or because it requires properly handling subpaths and holes, which I’m not ready to talk about just yet. However I will say that exclusive or isn’t a primitive like the other operations, but is defined in terms of union, intersect, and difference. Specifically A Xor B is defined as (A Union B) Difference (A Intersect B).

Where is inside?

Before I go any further, I need to define what it means for a point or path to be “inside” of another. The previous examples were simple and just by eyeing them I could tell if a point or path section was inside or not. However, I’ll need something more robust for more complex operations.

Traditionally there are two ways to determine if a given point is inside a closed path or not. First, there’s the winding rule. I count how many times the path winds around the given point. If it’s more than 0, then the point is inside the path. This is default way NSBezierPath determines if a point is inside a path or not.

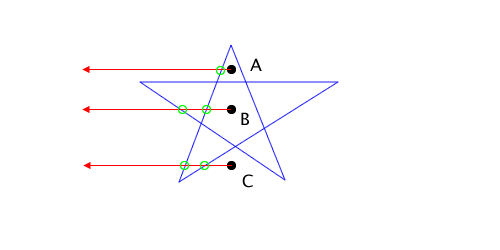
The second way is the even odd rule, which is the one I use in my implementation and for the rest of this post. I draw a ray from the given point to outside the bounds of the path. I then count how many times the ray intersects the path. If it is an odd number of times, then the point is inside the path. If even, it’s outside.

EvenOddRule

The star in the above diagram is one closed path. I’ve added three points A, B, and C to various places in the diagram, and applied the even odd rule to determine if they’re inside the star or not. The red arrow represents the ray I drew from the point to the outside of the path. (It doesn’t have to be a horizontal ray, it can go in any direction.) The ray from point A crosses the path exactly once, an odd number of times meaning it falls inside the star. The ray from point C crosses the path twice (even) so it is outside the star. Just by looking at the diagram it’s easy to see that A is inside and C is outside.

However, when I cast a ray from point B it also intersects with the star an even number of times, meaning it lies outside the path. This isn’t necessarily intuitive by looking at the diagram, but it is important for allowing holes in a path.

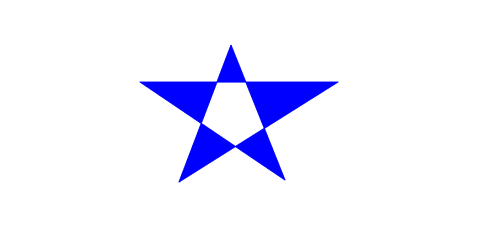
Both the winding rule and the even odd rule are called fill rules, because their main purpose is to determine which parts of a path are filled. Using the even odd rule the star above would be filled like:

EvenOddRuleFill

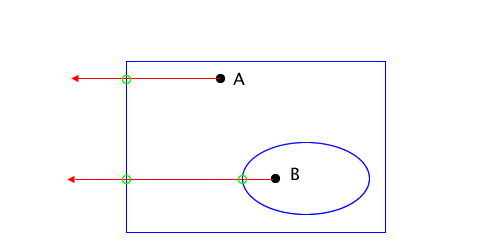
The star has a hole in the middle. However, this isn’t the only way holes can be introduced to a path. Holes can be formed by unconnected subpaths. For example:

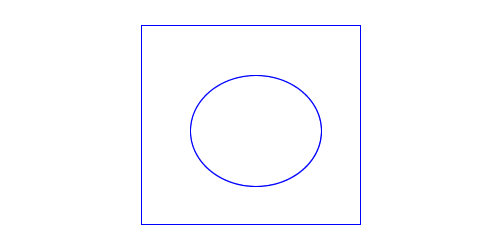
RectangleHoleFill

Here both the rectangle and ellipse are part of the same path; they’re just disjoint subpaths. As with the star, the same even odd rule applies meaning point A is inside the path, but B is not. The rectangle would be filled, except for the area the ellipse defines.

Nonintersecting Paths

Now that I’m done with that detour into fill rules and holes, I want to get back to boolean operations between two paths. I started with how to compute the results of a boolean operation if the two paths intersect, but what if the paths don’t intersect? There are two non-intersecting states I care about: when one path contains the other, and when the two paths lie outside of each other. I’ll start with two examples illustrating both of these states:

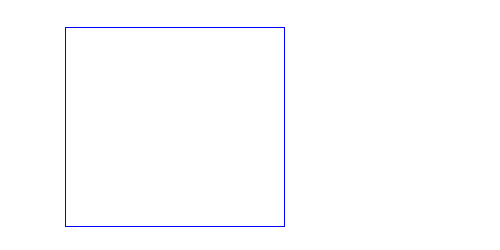
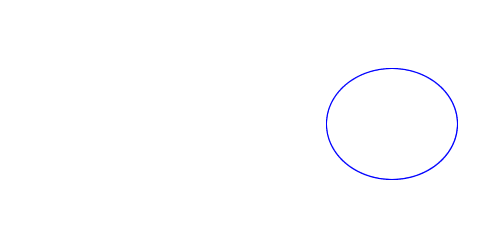
Contained ContainedPaths
Disjoint DisjointPaths

For the union operation, I want to eliminate any paths that are contained by another path. However a path is only contained by another if it falls inside the filled region as defined by the even odd rule. If the two paths lie outside of each other, the result of a union is both of them. So union-ing my two examples would result in:

Contained UnionContainedPaths
Disjoint UnionDisjointPaths

Intersect, being the logical and, eliminates any area where both paths aren’t filled. In the case where one path contains another, the contained path is the one where both paths are filled. If the two paths don’t overlap in any way, then the result is nil.

Contained IntersectContainedPaths
Disjoint

(nil)

Difference starts with one path, which I’ll call A, and removes all the places that another path, B, fills. In the case of containment which path contains the other matters. If I’m computing A –B, and A contains B, then I’ll add B as a hole subpath to path A. If B contains A, then all of A subtracted away, and I’m left with nil. If the paths don’t overlap, and I’m computing A –B, then nothing changes and I’m left with A as the result.

For this example, assume the blue rectangle is A and the red ellipse is B.

Contained (A –B) DifferenceContainedPaths
Contained (B –A)

(nil)

Disjoint (A –B) DifferenceABDisjointPaths
Disjoint (B –A) DifferenceBADisjointPaths

Intersecting Holes

Now that I’ve discovered holes, it’s time to see what happens when a path intersects with one. The process is the same as performing the operations on two normal paths, except which section (inside or outside) I chose to go in the result. I’ll start with a simple example:

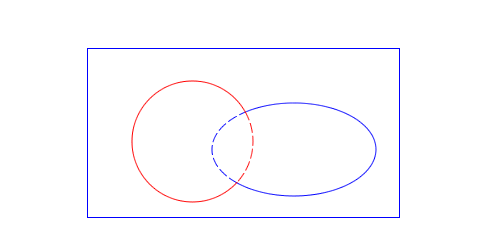
Hole

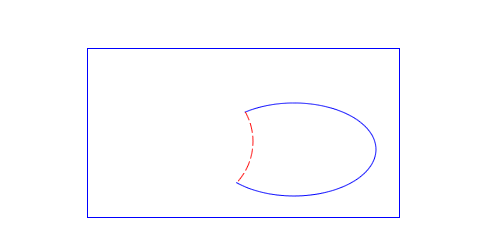
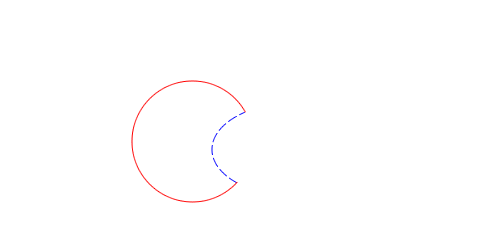
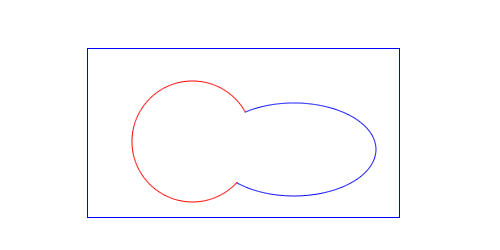
In the above diagram, the blue rectangle and ellipse form one path, with the ellipse being a hole. The red circle forms the second path. As before the inside sections of the intersecting (sub)paths are shown in a dashed style.

For a union I’d normally choose the outside sections of both paths. However since the blue ellipse is a hole, the red circle should intrude into it. So I would pick the inside of the red circle and the outside of the blue ellipse. More generally, I would always pick the outside section of a path, unless the other path was a hole, then I’d pick the inside section. The union result would be:
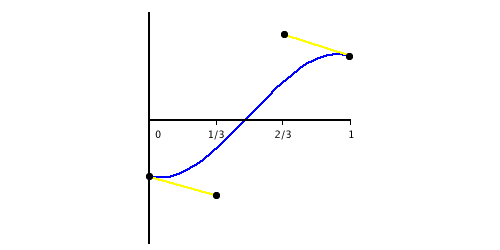
UnionHole

Note that since the blue rectangle is nonintersecting, it passes straight through to the result. (See the previous section about nonintersecting paths.)

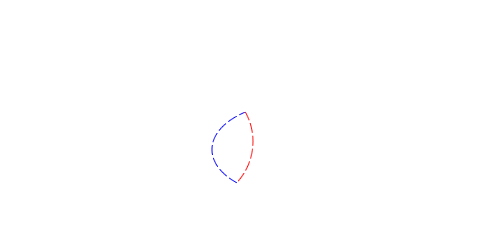
Intersect would normally choose the inside sections of each path. However, both paths clearly don’t exist inside of a hole. So when I choose which section to output for a given path, if the other path is a hole I’ll pick the outside section instead of the usual inside section. Here are the results of the intersect on these two paths:

IntersectHole

In the intersect I remove the blue rectangle entirely, since it is a nonintersecting (sub)path.

In a difference operation the order of the operands matters, so I’ll take each direction separately. If I subtract the red (path B) from the blue (path A), normally I would chose the outside of A and the inside of B. However, just from eyeballing the paths I can tell that I should take the outside of B. When choosing which section to output for B, I look to see if A is a hole. If it is, I take the outside of B instead the inside, resulting in:

DifferenceABHole

To compute B –A, I would usually pick the outside of B and the inside of A. But since A is a hole, I choose the inside of B, with the following results:

DifferenceBAHole

By now I’ve noticed a pattern for all the boolean operations. I choose the section of a path I normally would for that operation, unless the intersecting path is a hole. If it is I pick the opposite section than I normally would.

Exclusive Or Revisited

Now that I know about holes and how to perform union, intersect and difference on non-intersecting paths I can tackle exclusive or. I’ll return to the first example:

RectangleCircleWireframe

Now I take both the union and the intersect of both these paths, then subtract the intersect from the union for the final result. Below is the intermediate step after the union and intersect have been computed, but before the difference.

XorStep1

The union is in blue, and the intersect is in red. This diagram is a good illustration of an edge case. Technically there are two intersections between these two paths where the original rectangle and ellipse meet. However the two paths don’t fully cross each other at these intersections, they just meet at a point. Because of this, I ignore them. This holds true for any intersection: if the paths don’t cross each other then I ignore it for the purposes of boolean operations.

Since there are no crossing intersections, taking the difference happens between two paths that don’t intersect, and I fall back to those rules. The result of the xor:

XorFinal

There are two subpaths in the result: the union and the intersect subpaths. The interior subpath from the intersect thus forms a hole. If the result were filled, it would be:

XorFilled

Conclusion

All these pieces come together to be able to handle boolean operations for complex paths. First I handle all the intersecting subpaths as described, whether they are fill or hole. Then I process all nonintersecting subpaths, ignoring any intersecting subpaths for those computations.

This time I focused strictly on how to perform the boolean operations conceptually, based on the assumption I could find all the intersections. I covered how to think about paths as inside and outside sections, and how to perform boolean operations based on picking the correct section from each path. This is an important foundation for next time, when I’ll dig into the algorithms that actually implement these boolean operations.

How to implement boolean operations on bezier paths, Part 1

Something any serious vector graphics application has to implement is boolean operations. Boolean operations allow the user to combine bezier paths in interesting and powerful ways to create new shapes. The four common ones are:

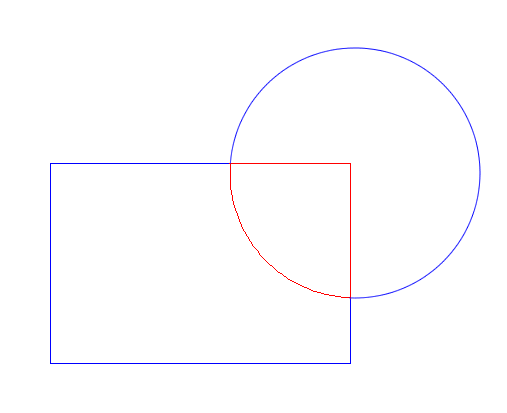
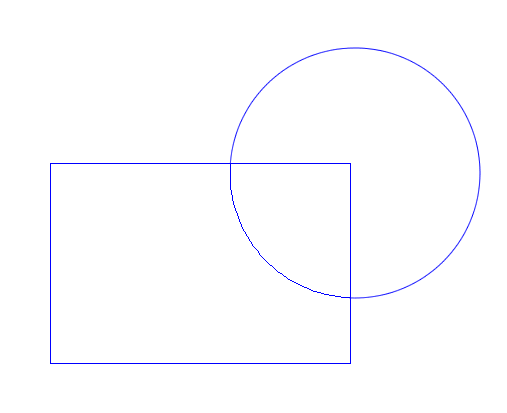
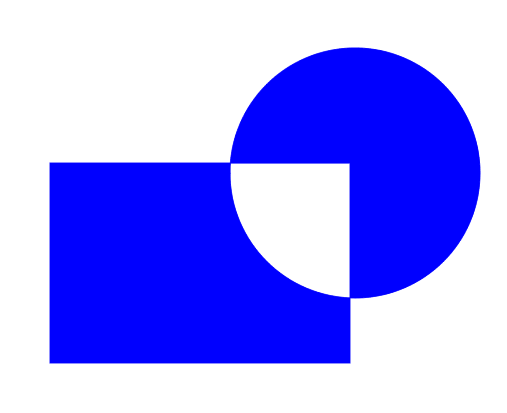
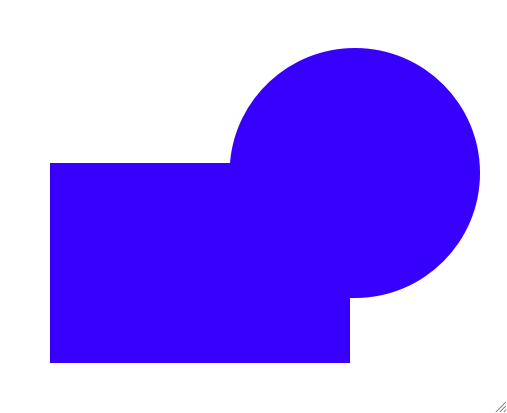
Operation Example
(None) Original
Union (Logical Or) Union
Intersect (Logical And)      Intersect
Difference Difference
Join (Exclusive Or) Join

Implementing them is somewhat involved, so I’m breaking the explanation up into two articles. This post will focus on finding intersections between individual bezier curves, and the next will show how to implement the boolean operations based on that. The algorithm presented will be able to handle arbitrary closed bezier paths, including those with holes and self intersections.

If you’re impatient, you can skip straight to the commented source code. As usual, I’ve released it under the MIT license. I encourage you to play with the sample application to see what it can do.

Clipping until it converges

This post I’m focusing on finding intersections between individual bezier curves using an algorithm called bezier clipping. It’s described in the paper “Curve intersection using Bezier clipping” by TW Sederberg and T Nishita. If you’re following along in the source code, it’s implemented in the FBBezierCurve class.

The first thing to realize is that finding intersections between curves isn’t exact. I won’t be able to plug the inputs into a formula and get back all the points where the curves intersect. Instead, I’ll iteratively whittle down the curves to ranges that could possibly intersect until I get down to a point or eliminate the curve entirely.

So the pseudocode for the main loop would be:

FBBezierCurve *us = ...; // passed in
FBBezierCurve *them = ...; // passed in
FBRange usRange = FBRangeMake(0, 1);
FBRange themRange = FBRangeMake(0, 1);
while ( !FBRangeHasConverged(usRange) && !FBRangeHasConverged(themRange) ) {
	BOOL intersects = NO;
	us = [us bezierClipWithBezierCurve:them range:&usRange intersects:&intersects];
	if ( !intersects )
		return; // no intersections
	them = [them bezierClipWithBezierCurve:us range:&themRange intersects:&intersects];
	if ( !intersects )
		return; // no intersections
}

Here a FBBezierCurve is one cubic bezier curve, as defined by two end points and two control points. FBRange is a parameter range defined by a minimum and maximum. A parameter value falls between [0..1] and is used for the parametric form of a bezier curve. In my case it keeps track of the range of the curve that could possibly intersect with the other curve.

The method bezierClipWithBezierCurve: refines the range passed in by determining the range where self could intersect with the curve passed in. It can also determine if there is no range where the two curves intersect. Don’t worry about how this is done right now, I’ll explain it later.

Each time through the loop I clip each curve a bit more, refining the range where the two curves might possibly intersect. The refined range is fed into the next iteration of the loop, which refines it a bit more. This continues until the minimum and maximum values of the range are close enough to be satisfactory (in my implementation, six decimal places). It’s also possible I discover, in clipping one curve against the other, that they don’t intersect at all. In that case, I can stop there.

The pseudocode above handles the common case where there is one (or no) intersection between the two curves. However cubic bezier curves can intersect up to nine times, so I need a way to detect when there are multiple intersections, and a way to find them. Detecting the possibility is easy; each time through the loop I compute how much I’ve reduced the intersection ranges by. If it’s less than 20%, then it’s likely there are multiple intersections, which would prevent the range from converging quickly.

Once I detect that I might have multiple intersections, I look at which range (and thus curve) is bigger. I split the correspond curve in half. I then recurse: for each of the halves I find the intersections between it and the other full curve. I take the combined results and return.

If you want to see the main loop in all it’s excruciating detail, check out the commented intersectionsWithBezierCurve:usRange:themRange:originalUs:originalThem: method. There are some implementation details I didn’t cover here, but are explained in the comments.

Fat Lines

In the previous section I glossed over how I can refine the range of a curve that could possibly intersect with the other curve. I’ll tackle how to do that now.

What I really need is a way to more simply represent the area a given bezier curve could possibly inhabit. Once I have that I can determine which parts of the other bezier lie inside of that area (and thus possibly intersect), and which don’t.
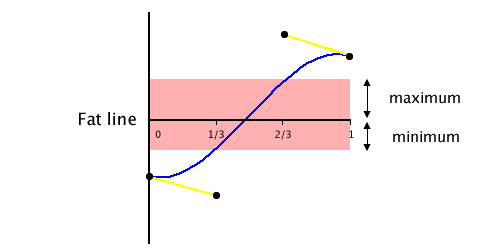
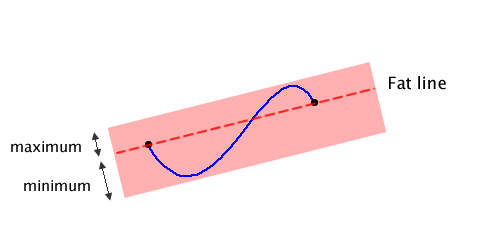
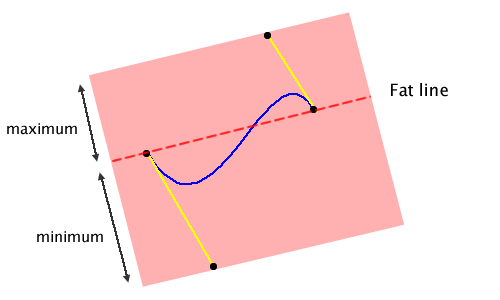
To this end, Sederberg and Nishita introduce the concept of a fat line. A fat line is a line through the end points of the bezier curve, but fat enough it encloses the entire curve.
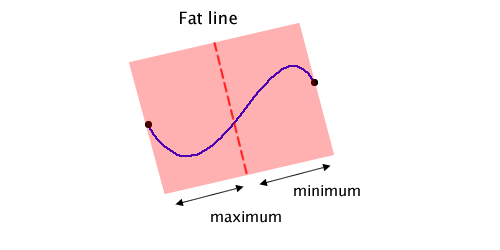
FatLine

Above you can see the bezier curve in blue and the fat line in the pink color, crossing through the curve’s end points. In code, the fat line is represented by a line (the dashed line above), plus two signed distances describing how far to extend the fat line above and below the dashed line. (Signed distance just means the value is negative if it falls below the line, positive if above.) The two distances form the bounds of the fat line, and are called the minimum and maximum bounds.

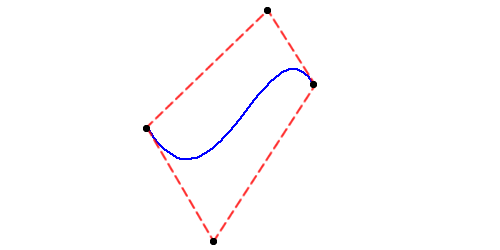
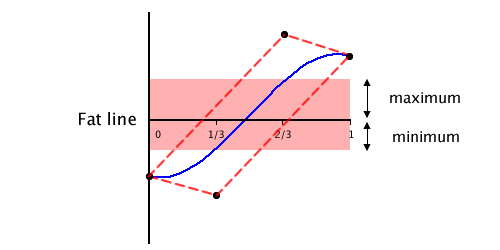
Computing an approximation to the minimum and maximum bounds is straightforward if I take advantage of the convex hull property. The convex hull is the polygon formed by connecting the end and control points with line segments. The convex hull property states that the polygon will completely enclose the bezier curve, as you can see below. The curve is in blue and the convex hull in red.

ConvexHull

So to compute the minimum and maximum bounds, I just compute the signed distances of the end and control points from the dashed line and chose the minimum and maximum distances.

ConvexHullFatLine

As you can see, using the convex hull to compute the minimum and maximum bounds doesn’t produce optimal results (i.e. the fat line fits loosely around the curve, not tightly). However the approximate bounds are cheap to compute and are good enough for my purposes.

Based on the fat line, it’s easy to see if any given point could possibly intersect with the bezier curve. Simply compute the signed distance from the line to the point. If that signed distance lies inside the fat line bounds, then it could intersect. If not, then it definitely doesn’t intersect.

Bezier clipping

I’ve simplified the clipping curve to a fat line and bounds, and can use it to see if a point could lie inside the clipping curve. Next I need to clip the subject bezier curve with the fat line.

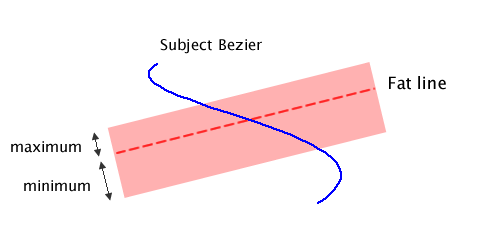
FatLineClip

The above diagram shows a range on the subject bezier that falls inside of the fat line, and thus could intersect with the other bezier. The piece inside the fat line is the bezier curve I want to end up with.

I start by calculating the signed distances of the end and control points of the subject bezier to the fat line. Next I construct a bezier curve from these distances, like so:

NSPoint endPoint1 = NSMakePoint(0, distance(fatline, subjectCurve.endPoint1));
NSPoint controlPoint1 = NSMakePoint(1.0/3.0, distance(fatline, subjectCurve.controlPoint1));
NSPoint controlPoint2 = NSMakePoint(2.0/3.0, distance(fatline, subjectCurve.controlPoint2));
NSPoint endPoint2 = NSMakePoint(1, distance(fatline, subjectCurve.endPoint2));

I spread the distance bezier points out evenly between 0.0 and 1.0 on the X axis, and use the distances from the fat line as Y values. By uniformly spreading the X values out, they will correspond to parameter values for the parametric form of the subject bezier.

DistanceBezier

Since the Y axis is the distance from the fat line, I can just throw the fat line bounds on the graph.

DistanceBezierSource

If I can calculate the X values of where the distance bezier crosses the minimum and maximum bounds, then I’ll have the range of the subject bezier that falls inside the fat line. To do that, I’ll once again rely on the convex hull property.

DistanceBezierWithFatLineConvexHull

In the above diagram, the convex hull is the dashed red line. Computing the intersection of two lines is easy, so I find the intersections of the convex hull with the horizontal minimum and maximum lines. The lowest and highest X values define the parameter range on the subject bezier curve that fall into the fat line bounds, and thus could intersect the other curve.

There are two special cases here, both occurring when the distance bezier doesn’t intersect with the minimum or maximum fat line bounds. If the distance bezier falls completely inside the fat line bounds, then I can’t whittle the subject bezier down any, and I’m forced to return the entire subject bezier untouched. If the distance bezier lies completely outside the fat line bounds, I know the two curves don’t intersect, and return that.

If I did successfully refine the possible intersecting range, I need to cut down the subject curve to match. Fortunately, de Casteljau’s algorithm makes it easy to split bezier curves at a specific parameter value. See the BezierWithPoints() helper function for the implementation of that algorithm.

That completes how to clip one bezier curve against another. To summarize: compute a fat line and bounds from the clipping bezier, compute a distance bezier from the other curve, and see where the distance bezier’s convex hull intersects the fat line bounds. Using the intersections’ x values as the parameter range where the curves could intersect, cut the subject bezier down to match the range.

Points of interest

Although the above description presents the complete algorithm for finding intersections between two bezier curves, I wanted to point out a couple of other things. These are implementations details that I either found interesting and/or difficult.

  1. After the main intersection loop (in intersectionsWithBezierCurve:usRange:themRange:originalUs:originalThem:) there’s a bit of code that checks to see if both curves have converged to a point. The loop bails as soon as one curve converges since the math for clipping falls apart as soon as one curve becomes a point. However for implementing the boolean operations, I need good parameter values for both curves. Since I know the 2D intersection point from the curve that converged, and I can guess a reasonable parameter value for the curve that didn’t, I can use Newton’s method to refine the parameter value of the curve that didn’t converge. Fortunately, that’s something I’ve done before when fitting curves to points.

  2. In the method that clips one bezier curve against the other (bezierClipWithBezierCurve:original:rangeOfOriginal:intersects:) you’ll notice that I don’t compute and clip against one fat line, but two. The second fat line is perpendicular to the regular one:

    PerpendicularFatLine

    Most of the time the regular fat line will clip out more of the curve than the perpendicular one. However, clipping against the perpendicular fat line does help the possible intersection range converge more quickly.

  3. I mention the convex hull a couple of times, but gloss over how to build it. It is made up of just the end and control points, but the order is important, and sometimes points need to be removed if they’re collinear. There are several algorithms to build the convex hull, but Graham Scan is supposedly the best for 2D curves. It took me a few tries to get it right. Not all of the reference implementations/descriptions that I found covered the edges cases, such as what to do when I encountered collinear points. The best I found ended up being this one.

    Check out the convexHull method for my implementation.

Conclusion

Although I’m finding bezier curve intersections for the purpose of performing boolean operations, it can be used for other applications as well. Heck if I know what those are though. So next time I’ll dive into implementing union, intersect, difference, and join.

Be sure to enjoy the complimentary source code in the mean time.