
How to implement a magic wand tool
The magic wand tool has always fascinated me: it is a common tool to find in a bitmap editor, it can select a complex array of pixels, and until I started studying image processing, it wasn’t at all intuitive how it was implemented. Since it is such a common tool, and Cocoa/Quartz doesn’t provide an obvious way of implementing it, I thought I would attempt to tackle how to implement it here.
There is a lot more involved in implementing a magic wand tool than I originally thought. Although generating a bitmap mask that selects pixels is the obvious thing that I had to do, implementing the marching ants around the bitmap selection was also surprisingly involved. After figuring out both the image mask generation and marching ants, I decided the article wouldn’t be complete unless I also implemented a basic copy operation, so the user could copy the selection into another application. Although not technically part of the magic wand tool, implementing a copy command shows how you would actually use the selection generated by the magic wand tool.
Overview
The idea of a magic wand is simple. The user clicks on a point in the image, and the magic wand tool finds all the pixels around that point that are similar in color, given a tolerance level, and selects them.
For example, given the following picture:
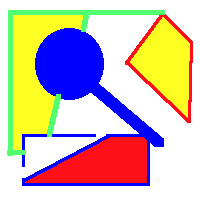
If the user clicked in the middle of the blue, magnifying glass-like shape, the magic wand would select all the blue pixels connected to it, and draw marching ants around it, like so:
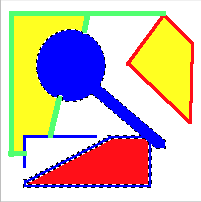
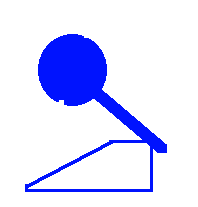
From here, the user can select the Edit > Copy menu item to copy the selected pixels to the clip board. In this case, the contents of the clipboard would look like:
There are three interesting things happening here, that I’ll dig into deeper. First is the determination of which pixels around the clicked point should be selected, and the generation of an image mask. Second is the generation of a vector path from the image mask, that can be used to render the marching ants around the selection. Finally, there is using the image mask in conjunction with the original image, to pull out the selected pixels and put them on the clipboard.
The selection
Before I delve into how to generate a bitmap selection, I wanted to touch on what the selection is made up of. In bitmap applications the selection is merely an image mask the same size as the canvas. For each pixel in the original image, there is a pixel in the image mask that says whether that pixel is in the selection or not.
You can think of an image mask as an image with a grayscale color space and no alpha. Each pixel has a range of 0 to 255, where 255 means the corresponding pixel is off, or not in the selection, while a value of 0 means the corresponding pixel in the image is in the selection. Although each pixel in the image mask has a range of 0 to 255, we only use the values 0 and 255 for the purpose of pixel selection.
CoreGraphics allows an image mask to be used to clip the drawing context. So by setting the image mask (i.e. selection) as a clip before drawing the image, you can draw just the pixels in the selection.
Determining the selected pixels
The algorithm for determining the selected pixels is basically a flood fill algorithm, which has been well documented. The basic idea is, given a point, look to the top, bottom, left and right and see if they match the specified color. If they do, then mark the corresponding point in the mask. The pseudo-code for the naive algorithm is:
void Select(float x, float y, Color colorToMatch)
{
	Color color = GetColor(x, y);

	if ( color == colorToMatch ) {
		SetPixelOnInMask(x, y);

		Select(x - 1, y, colorToMatch);
		Select(x + 1, y, colorToMatch);
		Select(x, y - 1, colorToMatch);
		Select(x, y + 1, colorToMatch);
	}
}
Please note that the above is pseudo-code and leaves out a couple of implementation details, such as stopping at the edge of the image, not revisiting pixels it has already visited, and the implementations for GetColor() and SetPixelOnInMask(). It is provided merely to illustrate how logically the algorithm should work.
If the specified point matches the color we want, then we mark it in the image mask as part of the selection, and recurse on all four points around the matching point. This algorithm will work as is, except that it would be exceptionally slow and possibly blow the top off of the stack from all the recursion. So although the pseudo-code is a good logical demonstration of what we want to do, no one actually implements a flood fill algorithm this way.
Instead of using recursion, the algorithm I will describe uses a loop and a stack of line segments to keep track of the pixels that need to be examined. In this algorithm, the selection is created one horizontal line segment at a time.
The algorithm starts out searching to the left and right of a specified point, looking for adjacent pixels with the same color that we want to select. The search left or right stops when a pixel that doesn’t match the specified color is encountered. A line segment is created from this search. This line of pixels are in the selection, so they are marked in the image mask, and the line segment is pushed onto the stack for later processing. Then the algorithm loops until the stack is empty, processing each line segment on the stack one at a time. For each line segment encountered, it will walk the points directly above and below it, repeating the line search at the beginning of the algorithm. Any line segments found in this search will be added to the stack. This is continued until the stack is depleted.
To ensure the algorithm doesn’t loop back on itself, a map is used to mark which pixels have already been examined.
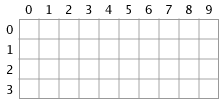
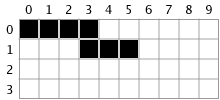
Take the following zoomed image as an example.
![]()
Let’s assume the user clicks at the point (4, 1), which is where a blue pixel resides. At the start of our algorithm, all the mask pixels are white, meaning nothing is selected:
The first thing to do is perform a line search. We do that by traveling left of the the specified point (4, 1) and see how far in that direction we can go before we hit a pixel that is not blue. As you can see we can only go one pixel before we hit a white pixel. So our leftmost edge for the current line segment is 3.
Next we travel right from the specified point (4, 1) until we reach a non-blue pixel. On the right side we also only go one pixel, leaving our rightmost edge as 5.
Now that we have identified an entire line segment as being in the selection, we can mark it as such in the mask. Our mask now becomes:

Finally, we push the line segment we just found, [(3, 1), (5, 1)] onto the once empty stack.
We enter the part of the algorithm where we pop the top line segment, [(3, 1), (5, 1)], off the stack and process it. First we walk each integer point on the line segment, checking the point directly above it. Since our line segment is [(3, 1), (5, 1)], we will check points (3, 0), (4, 0), and (5, 0).
Checking point (3, 0), we find the color blue, so we start the line search again. We search left and find that 0 is our left most edge. We then search right of (3, 0), but there are no blue pixels there, so our right edge is 3.
Since we found a new line segment, [(0, 0), (3, 0)], we mark it on the mask like so:
Then we push the line segment [(0, 0), (3, 0)] onto the stack to be further processed.
We finish checking above the first line segment we found, [(3, 1), (5, 1)], by looking at the pixels at (4, 0), and (5, 0). However, they are not blue, so we don’t do anything with them.
Before we can be finished with the [(3, 1), (5, 1)] line segment, we have to look at the points directly below it, or points (3, 2), (4, 2), (5, 2).
When we examine point (3, 2), we see a blue pixel so we process it by doing a line search. However, after searching left and right, there are no addition pixels, so our final line segment is just [(3, 2), (3, 2)]. We mark it on the mask so it is selected:

We are now done processing the first line segment, [(3, 1), (5, 1)].
There are two line segments that are still on the stack, waiting to be processed: [(0, 0), (3, 0)] and [(3, 2), (3, 2)]. Since there are not any additional line segments either above or below them, they would not mark any additional pixels in the mask, and the algorithm would terminate.
Converting an image mask to a bounding path
One of the things we need to do with the image mask is convey to the user which pixels are selected. Traditionally, this has been done by rendering marching ants which precisely bound the pixels in the selection. In order to implement marching ants, we need to know the path that precisely bounds the pixels in the selection. We need to convert our image mask into a vector path.
The algorithm to do this happens in two phases. In the first phase, we convert the image mask into a dictionary full of line segments that make up the path around the image mask. The dictionary maps a point to an array of line segments that have end points there. The second phase, walks the dictionary and concatenates all the line segments into a closed vector path.
In the first phase, we walk the entire image mask and detect where the edges of the mask are. We do this by examining each pixel to determine if it is black (in the selection). If it is, then we look at the four pixels around it. If a pixel on a side of it is not in the selection (white), then we add a one pixel line segment to the dictionary for that side.
In the second phase, we pull a starting point out of the dictionary, and add the first line segment found there to the vector path, also removing that line segment from the dictionary. Using the end point of the line segment we just added to the path, we pull another line segment from the dictionary. Like the first line segment we pulled from the dictionary, we add it to the path, and remove it from the dictionary. We continue pulling line segments from the dictionary until we reach a point that has no corresponding line segments in the dictionary. This means we have completed the path, and we close it.
Take our previous image mask as an example:
In the first phase, we just walk the entire mask examining each pixel in turn. The pixel at 0, 0 is black, meaning it is on. Because it is on, we search the four pixels around it for pixels that are off (white). We find that the pixels on the top, bottom, and left are off (we assume any pixels out of bounds are off). Because of that, we add line segments for all three sides, top, bottom, and left, respectively, to the dictionary:
[(0, 0), (1, 0)], [(0, 1), (1, 1)], [(0, 0), (0, 1)]
Note that although in the image mask data we count the centers of the pixels, in the vector path we’re constructing, we count the grid lines. i.e. (0, 0) is the top left corner of the first pixel, while (0, 1) is the bottom left corner of the first pixel. Also note that although I’m listing the line segments out, they are in a dictionary keyed off of the end points. So if you were to look up (0, 0) in the dictionary, you would get an array back of the following line segments:
[(0, 0), (1, 0)], [(0, 0), (0, 1)]
because they intersect at that point. Although the dictionary isn’t really used in the first phase, it’s integral to the second phase.
If we continued the first phase to completion, we’d end up with 18 line segments, which are listed in the table below, sorted by which pixel generated them.
| Pixel at | Line segments |
| 0, 0 | [(0, 0), (1, 0)], [(0, 1), (1, 1)], [(0, 0), (0, 1)] |
| 1, 0 | [(1, 0), (2, 0)], [(1, 1), (2, 1)] |
| 2, 0 | [(2, 0), (3, 0)], [(2, 1), (3, 1)] |
| 3, 0 | [(3, 0), (4, 0)], [(4, 0), (4, 1)] |
| 3, 1 | [(3, 1), (3, 2)] |
| 4, 1 | [(4, 1), (5, 1)], [(4, 2), (5, 2)] |
| 5, 1 | [(5, 1), (6, 1)], [(5, 2), (6, 2)], [(6, 1), (6, 2)] |
| 3, 2 | [(3, 3), (4, 3)], [(3, 2), (3, 3)], [(4, 2), (4, 3)] |
Note that only pixels that are on generate line segments, and that the line segments are not in order.
In the second phase, we start by asking the dictionary for the first key. Let’s suppose the dictionary gives back the key (0, 0), which is a point. We tell the path to start at (0, 0). We immediately do a dictionary look up for all the line segments that intersect at (0, 0). This returns:
[(0, 0), (1, 0)], [(0, 0), (0, 1)]
We choose whatever line segment is first in the array, and remove it from the dictionary, to ensure we don’t track back on ourselves. In our example, that gives us the line segment [(0, 0), (1, 0)]. Since the point we started with was (0, 0), we tell the path to create a line to (1, 0).
Next we do a dictionary look up for all the line segments at (1, 0). Like before, we simply choose whatever line segment is first, and repeat the previous steps to add a line to the path and move to the next point.
By the completion of the second phase, we have a path around the selection. We can then use the resulting path to stroke a pattern around the pixels, creating marching ants.
Code architecture
Like my previous article on bitmap brushes, I have provided sample code along with this article to demonstrate the algorithms I discuss. There are six classes that make up the sample code: MyDocument, CanvasView, Canvas, MagicWand, SelectionBuilder, and PathBuilder.
MyDocument is your standard NSDocument based class. In this example, it simply loads an image when the user picks one from File > Open and then hands it off to CanvasView. Since this class is so simple, and rather tangential to the topic here, I won’t mention it the rest of the article.
CanvasView is an NSView derived class that draws the Canvas to the screen and accepts user input. It passes off mouse downs to the MagicWand tool to be processed, but handles the copy operation itself. The selection is a property of the view, so it is stored in this class. The CanvasView is also responsible for rendering marching ants if there is a selection. It invokes the PathBuilder helper class to convert the image mask into a NSBezierPath.
The Canvas class represents the surface the user interacts with. It contains the pixels the user can select and copy. In this sample code, Canvas doesn’t really do anything exciting, because it passes the pixel selection off to a helper class, SelectionBuilder. Other than that, the Canvas class simply renders its contents into a NSGraphicsContext. We will ignore the Canvas class for the rest of the article, although it is in the sample code.
The MagicWand class represents the tool the user acts upon the canvas with. It is a rather thin class in that it only processes a mouse down event. It does so by asking the Canvas for a selection mask, while providing where the user clicked and a tolerance parameter. It then passes the returned selection mask off to the CanvasView.
SelectionBuilder is a helper class that implements the flood fill algorithm for determining the selected pixels, as described in the previous selection. It takes a source image, a point to start at, and a tolerance level and returns an image mask. SelectionBuilder was broken off into its own class because it builds up a lot of intermediate state during the algorithm, and the algorithm is somewhat complex to implement, requiring several methods.
PathBuilder is a helper class that implements the image mask to vector path algorithm described in the previous section.
There are four classes worth digging into in the sample code: CanvasView, MagicWand, SelectionBuilder, and PathBuilder. We will handle them in that order.
CanvasView
The CanvasView is interesting because it is the window into the rest of the system. It responds to user input (mouse downs and Edit > Copy) and displays both the canvas and the selection, if there is one.
The init method is very simple:
- (id)initWithFrame:(NSRect)frame {
    self = [super initWithFrame:frame];
    if (self) {
		// Create both the canvas and the magic wand tool. Create the canvas
		//	the same size as our initial size. Note that the canvas will not
		//	resize along with us.
		mCanvas = [[Canvas alloc] initWithSize:frame.size];
		mMagicWand = [[MagicWand alloc] init];

		// The following members are only used when we have a selection.
		mSelection = nil;
		mCachedPath = nil;
		mPhase = 0.0;
    }
    return self;
}
Like in the previous article, the CanvasView creates both the canvas and the tool the user will interact with. Since the selection is a property of the view, it also initializes some variables that are used to hold and render the selection. Note that mSelection is a CGImageRef and that mCachedPath is a NSBezierPath. The former is used in the copy operation to mask everything out that isn’t the selection, and the latter is used to render the marching ants feedback.
There is a dealloc method as well, that simply releases all the member data.
Handling mouse down
The view is where the mouse handling occurs. Since the magic wand tool only cares about mouse down events, that is the only mouse event method we override here:
- (void)mouseDown:(NSEvent *)theEvent
{
	// Simply pass the mouse down to the magic wand. Also give it the canvas to
	//	work on, and a reference to ourselves, so it can translate the mouse
	//	locations.
	[mMagicWand mouseDown:theEvent inView:self onCanvas:mCanvas];
}
As you can see we immediately pass the mouse down event off to the magic wand tool. The magic wand determines what the selection should be, but then, since the view owns the selection, calls back into the CanvasView class to set the selection:
- (void) setSelection:(CGImageRef)mask
{
	// First free up the old selection, which includes the mask and the
	//	path feedback.
	CGImageRelease(mSelection);
	mSelection = nil;
	[mCachedPath release];
	mCachedPath = nil;

	// If the caller gave us a new selection, retain it
	if ( mask != nil )
		mSelection = CGImageRetain(mask);

	// We render selection feedback, so we need to invalidate the view so it
	//	is rendered.
	[self setNeedsDisplay:YES];
}
As mentioned earlier, the selection is just an image mask; In our sample code it is represented by a CGImageRef. When we get a new selection we have to free up the old selection, which includes the image mask and bezier path. We then retain the selection (copying is expensive) and mark the entire view as needing a redraw, so that the marching ants will draw. Note that the bezier path isn’t created here, but will be lazily initialized later on, when we try to render.
Rendering the selection
Speaking of rendering the CanvasView, we just did an invalidate which will cause a redraw. The first part of drawRect is the standard “draw the contents of the canvas” code:
- (void)drawRect:(NSRect)rect {
	// Simply ask the canvas to draw into the current context, given the
	//	rectangle specified. A more sophisticated view might draw a border
	//	around the canvas, or a pasteboard in the case that the view was
	//	bigger than the canvas.
	NSGraphicsContext* context = [NSGraphicsContext currentContext];

	[mCanvas drawRect:rect inContext:context];
This is exactly like the previous sample code, in that we ask the canvas to draw into a specific context. The drawing of the marching ants is a little more involved, so I’ll cover it in segments:
	// Since the selection is a property of the view, we need to render it here.
	//	First ask for the selection path. If we don't have one, then we don't
	//	have a selection and can bail.
	NSBezierPath *path = [self selectionPath];
	if ( path == nil )
		return;
The first thing to do is to check to see if we even have a selection. If we don’t, then we can stop now. This is where we generate the bezier path for the marching ants, by using the selectionPath helper method.
Next we render a phase of the marching ants, which will consist of alternating white and black line segments, each four pixels in length.
	// We don't want anti-aliasing since we're drawing 1 pixel lines around
	//	the selection
	[context setShouldAntialias:NO];

	// First, layer on a 1 pixel line of white. We do this because the line
	//	dash alternates between black and transparent, so the white shows
	//	up where the line dash draws transparent. We set a line dash pattern
	//	here to clear the one we set below, the last time we drew.
	float fullPattern[] = { 1.0, 0.0 };
	[path setLineDash:fullPattern count:2 phase:0];
	[[NSColor whiteColor] set];
	[path stroke];

	// Next draw a 1 pixel line that alternates between black and transparent
	//	every four pixels. This gives the selection marching ants around it.
	float lengths[] = { kPhaseLength, kPhaseLength };
	[path setLineDash:lengths count:sizeof(lengths)/sizeof(lengths[0]) phase:mPhase];
	[[NSColor blackColor] set];
	[path stroke];
We turn off anti-aliasing for the rendering of marching ants because they will be 1 pixel lines, and we want them precise, not fuzzy 2 pixel lines. First we have to render the white background, because the actual line dash pattern rendered by the second NSBezierPath stroke alternates between black and transparent. Also note that the line dash has to be cleared from the white line, since we don’t keep two paths around: one for the the white background, and one for the black dashed foreground.
Notice that on the second NSBezierPath stroke, there is a mPhase member variable used. This is used to animate the marching ants by shifting the pattern by one pixel each time the marching ants are rendered.
The last thing we want to do is make the ants actually march. In order to animate them, we set a timer when we finish rendering one phase of the ants:
	// The marching ants need to animate, so fire off a timer half a second later.
	//	It will update the mPhase member and then invalidate the view so
	//	it will redraw.
	[NSTimer scheduledTimerWithTimeInterval:0.5 target:self selector:@selector(onSelectionTimer:) userInfo:nil repeats:NO];
Note that the timer does not repeat. It will wait until after the next phase of the ants is rendered before setting off a timer to move the subsequent phase.
The actual timer method is fairly simple:
- (void) onSelectionTimer:(NSTimer*)timer
{
	// This timer is set from inside of drawRect: if it rendered the marching
	//	ants. It advances the phase then marks the view for a redraw.

	// Increase the the phase so the ants appear to march. Let the phase wrap
	//	around when we reach the end of the phase.
	mPhase = mPhase + 1.0;
	if ( mPhase > (2 * kPhaseLength - 1.0) )
		mPhase = 0.0;

	// It would be more efficient to take the bounds of the selection path (mCachedPath)
	//	and only invalidate that.
	[self setNeedsDisplay:YES];
}
As stated earlier, the timer just increments the phase by one so the ants appear to move. If we reach the end of the pattern, we just reset it back to the beginning, where the pattern repeats, so the animation looks smooth. Finally, we mark the view as needing display, so the newly moved ants will render. Like in previous examples, we invalidate the entire view, although we could get away with just invalidating the bounds of the NSBezierPath.
The final method used in rendering the marching ants, that we conveniently skipped over earlier, takes the selection image mask and converts it into a NSBezierPath:
- (NSBezierPath *) selectionPath
{
	// This method will lazily generate a bounding path around the image mask
	//	and cache it for later use.

	// If no selection, then there's no path around it
	if ( mSelection == nil )
		return nil;

	// If we've already created the selection path, then just return it
	if ( mCachedPath != nil )
		return mCachedPath;

	// OK, we have to build a path from the selection. Create a PathBuilder object
	//	and pass it our selection. Ask for a path back.
	PathBuilder* builder = [[[PathBuilder alloc] initWithMask:mSelection] autorelease];
	mCachedPath = [[builder path] retain];

	return mCachedPath;
}
Generating a path from the image mask is expensive, so we attempt to be efficient here. First, if there is no selection, then there are no marching ants to render, so we return nil. Second, if we have already created a NSBezierPath for the current selection, just return it.
Since generating a path from an image mask is involved, and potentially reusable in other classes, the actual algorithm is implemented in a helper class, PathBuilder. Here we instantiate one, and use it to create our NSBezierPath, which we immediately cache for later use.
Copying the selection
The final responsibility of the CanvasView class is to copy the selection to the clipboard, when the user picks the Edit > Copy menu item. This happens in three phases: checking to see if we have a selection (always important), rendering the selection into an image, and putting the resulting image on the clipboard.
First we start out with a sanity check:
- (IBAction) copy:(id)sender
{
	// If we don't have a selection then we don't have anything to copy
	if ( mSelection == nil )
		return;
As you can see we simply override the standard copy event handler. Of course, if this were a real system, we wouldn’t even enable the Copy menu item if there was no selection.
Next, we render the selected pixels into an image:
	// We're going to render the canvas into an NSImage that we can then hand
	//	off to the pasteboard. So create an NSImage the same size as our canvas.
	NSSize canvasSize = [mCanvas size];
	NSImage *image = [[[NSImage alloc] initWithSize: canvasSize] autorelease];

	[image lockFocus];

	// Before we ask the canvas to draw itself into our image, we want to clip
	//	it. So drop down into CoreGraphics and clip the context with our image
	//	mask.
	NSGraphicsContext* context = [NSGraphicsContext currentContext];
	CGContextRef cgContext = [context graphicsPort];
	CGContextSaveGState(cgContext);

	CGContextClipToMask(cgContext, CGRectMake(0, 0, canvasSize.width, canvasSize.height), mSelection);

	// Ask the canvas to draw itself in its entirety.
	[mCanvas drawRect:NSMakeRect(0, 0, canvasSize.width, canvasSize.height) inContext:context];

	CGContextRestoreGState(cgContext);

	[image unlockFocus];
This starts out simply. We create an NSImage the size of our canvas, and focus it for drawing. This will be the image we draw into, and ultimately place on the clipboard.
Although most of our drawing thus far has stayed in the Cocoa layer, we have to drop down into CoreGraphics in order to clip to an image mask. After we clip to our selection, we ask the canvas to draw itself into our image. Since we masked out all the pixels not in the selection, only the selected pixels will be drawn into our image.
Finally, we restore the clipping state and unfocus the image.
The last bit of copying to the clipboard is the mechanics of putting our newly created image on the clipboard:
	// Now that we have the selection drawn into an NSImage, give it to the
	//	pasteboard as a TIFF.
	NSPasteboard *pasteboard = [NSPasteboard generalPasteboard];
	NSArray *types = [NSArray arrayWithObjects:NSTIFFPboardType, nil];
	[pasteboard declareTypes:types owner:self];
	[pasteboard setData:[image TIFFRepresentation] forType:NSTIFFPboardType];
}
Since it is easy to get a TIFF representation out of an NSImage, and TIFF is a publicly known pasteboard type, we stuff our image onto the clipboard as a TIFF.
MagicWand
The MagicWand class represents the magic wand tool the user wields to interact with the canvas. It is a simple tool, and the only really interesting thing it does is hold the threshold parameter.
Threshold
The threshold parameter is a float that ranges from 0.0 to 1.0, and determines how close a given color is to the selected color, before it is selected. If threshold is 0.0, then colors have to exactly match the chosen color. If it is 1.0, then every color will match, and be selected. By default, the threshold is 0.125, or, in other words, colors can be up to 12.5% different from the specified color, and still be selected.
Example selections from different threshold values:
| mThreshold | Image Selection |
| 0.0 | 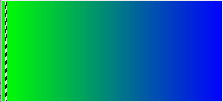 |
| 0.125 | 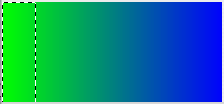 |
| 0.5 | 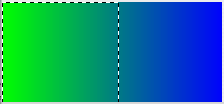 |
| 1.0 | 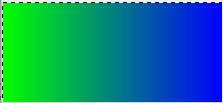 |
Handling mouse down
The only real action in the MagicWand class happens in the mouseDown method. This method is called by the CanvasView class, as we saw earlier:
- (void) mouseDown:(NSEvent *)theEvent inView:(CanvasView *)view onCanvas:(Canvas *)canvas
{
	// Translate the event point location into a canvas point
	NSPoint currentPoint = [self canvasLocation:theEvent view:view];

	// Ask the canvas to generate an image mask that selects the pixels around
	//	the point the user clicked on, that are within the tolerance specified.
	CGImageRef mask = [canvas floodFillSelect:currentPoint tolerance:mTolerance];

	// The selection is really a property of the view, so give the mask to the
	//	view
	[view setSelection:mask];

	// We're done with the selection mask, so free it up
	CGImageRelease(mask);
}
mouseDown here essentially acts as a moderator between the canvas and the view. After translating the mouse down point from window to canvas coordinates, it simply asks the canvas to construct an image mask based on the point and tolerance. It then immediately hands the image mask to the CanvasView.
Since I’m not going to cover the Canvas class in detail, I should mention that its floodFillSelect method immediately calls through to the SelectionBuilder class, without any further processing.
As you can see, there’s not a whole lot to the actual MagicWand class. It simply contains a parameter and moderates between the canvas and view.
SelectionBuilder
The SelectionBuilder class implements the flood fill algorithm described at the beginning of this article. The algorithm requires a decent amount of state data, which are stored as member data. The init initializes the member data, starting with the source image:
- (id) initWithBitmapImageRep:(NSBitmapImageRep *)imageRep point:(NSPoint)point tolerance:(float)tolerance
{
	self = [super init];

	if ( self != nil ) {
		// Just retain the source image. We don't want to make a heavy copy of it
		//	(too expensive) but we don't want it going away on us
		mImageRep = [imageRep retain];

		// Record the width and height of the source image. We'll use it to
		//	figure out how big to make our mask.
		mWidth = [mImageRep pixelsWide];
		mHeight = [mImageRep pixelsHigh];
The source image is represented by a NSBitmapImageRep, mainly because that’s what the Canvas is implemented with. We simply retain the source image, since copying is expensive and we’re not modifying the source image anyway. We also cache off the size of the source image because we use it in several places, including to create the output mask and the visited pixels map.
Next we create our output image mask, which will represent the selected pixels:
		// Calloc marks the mask as all black, or all masked in (i.e. the image
		//	would be all there, by default). So use memset() to mark them all
		//	transparent.
		mMaskRowBytes = (mWidth + 0x0000000F) & ~0x0000000F;
		mMaskData = calloc(mHeight, mMaskRowBytes);
		memset(mMaskData, 0xFF, mHeight * mMaskRowBytes);
For efficiency reasons, we align the mask rows to 16 byte increments. Also note that we want all pixels to start out not selected, so we fill the image mask with 0xFF. Recall that image masks are essentially 8-bit grayscale images, so our mask starts out a solid white.
As described in the overview, we need a map of BOOLs to keep track of which pixels we have examined:
		// Calloc marks them all as not visited
		mVisited = calloc(mHeight * mWidth, sizeof(BOOL));
The visited map is the same size as the source image and output mask. By default, none of the pixels have been examined, so their value is set to NO.
Next we remember the user clicked point, and the color at that point, so we can use it for comparing to other colors later:
		// If the user clicked on a non-integral value, make it an integral value.
		//	We only deal with raw pixel data, not interpolated values. Also flip
		//	the y component because pixels start at the top left, but the view
		//	origin was at the bottom left
		mPickedPoint.x = floor(point.x);
		mPickedPoint.y = mHeight - floor(point.y);

		// Grab the pixel data at the location the user clicked on.
		[mImageRep getPixel:mPickedPixel atX:(int)mPickedPoint.x y:(int)mPickedPoint.y];
For the the user specified point, we need to do a little processing. First, we need to snap any floating point values to an integral value. That’s because we will be dealing directly with raw pixel data, which only exists on integral points. Also, the coordinates for the pixel data start at the top left, while the point passed in has its origin at the bottom left, so we flip the y coordinate.
We also grab the raw pixel data of the user selected point. mPickedPixel is an unsigned int[5], and holds the raw color components. It is statically sized a five components, with the thought that CMYKA probably has the highest number of components that we’ll encounter. However, in a real system it would be wise to ask the colorspace of the source image how many components there are, and dynamically allocate mPickedPixel accordingly.
When we compare the raw pixel data of mPickedPixel to a given point, we have to take the tolerance parameter into account:
		// We need to scale the tolerance from [0..1] to [0..maxSampleValue], but to
		//	do that, we first need to figure out what the maximum sample value
		//	is. Compute how many bits are in a pixel component, then use that.
		int bitsPerSample = [mImageRep bitsPerPixel] / [mImageRep samplesPerPixel];
		int maxSampleValue = 0;
		int i = 0;
		for (i = 0; i < bitsPerSample; ++i)
			maxSampleValue = (maxSampleValue << 1) | 1;

		mTolerance = tolerance * maxSampleValue;
Although the tolerance parameter passed in tells us how different pixels are allowed to be, it is not properly scaled such that it can be used directly. We need to know what the tolerance is, in the range of a pixel component. That is, if the tolerance parameter passed in is 1.0, then the mTolerance member should be the maximum value for a pixel component (e.g. 255 for a 8-bit component). We simply use the number of bits per pixel component to calculate the maximum component value, then multiply that by the tolerance parameter, to get the absolute tolerance.
Finally, the algorithm uses a stack of line segments to know which parts of the image need to be further processed:
		// Create an intermediate stack to hold the line segments that still
		//	need to be processed.
		mStack = [[NSMutableArray alloc] init];
	}

	return self;
}
To keep things simple, I elected to not create a custom class for a stack, but instead simply used a NSMutableArray in that capacity. Also, the line segments on the stack are simply NSDictionarys, with three values for the left, right, and y coordinates of the line segment.
There is also a dealloc method that frees up all the data:
- (void) dealloc
{
	// Let go of our source image, free up our visited buffer, and our stack.
	[mImageRep release];
	free(mVisited);
	[mStack release];

	[super dealloc];
}
Note that we intentionally do not free up the mask data because we will be returning it to the caller.
Algorithm overview
After constructing a SelectionBuilder object, the caller will call the mask method to actually create the selection mask. The mask method is fairly high level and matches up with the overview description of the algorithm at the top of the article:
- (CGImageRef) mask
{
	// Prime the loop so we have something on the stack. searchLineAtPoint
	//	will look both to the right and left for pixels that match the
	//	selected color. It will then throw that line segment onto the stack.
	[self searchLineAtPoint:mPickedPoint];

	// While the stack isn't empty, continue to process line segments that
	//	are on the stack.
	while ( [mStack count] > 0 ) {
		// Pop the top segment off the stack
		NSDictionary* segment = [[[mStack lastObject] retain] autorelease];
		[mStack removeLastObject];

		// Process the segment, by looking both above and below it for pixels
		//	that match the user picked pixel
		[self processSegment:segment];
	}

	// We're done, so convert our mask data into a real mask
	return [self createMask];
}
As in the original algorithm, we start off by doing a line search on the horizontal line that the user clicked on. This is done by invoking the searchLineAtPoint, which implements the line search algorithm. If it finds a matching line segment, then it marks it in the image mask, and pushes it onto the stack for later processing.
We then loop until the stack is empty. For each line segment on the stack, we pop it off the stack, and invoke the processSegment method on it. This method simply walks the line segments above and below and repeatedly performs a line search on each point, by invoking the searcheLineAtPoint method. If more matching line segments are found, they are marked in the mask and pushed onto the stack.
Finally, after we are done processing all the line segments, we have to convert our raw mask data into a CGImageRef that the caller can use. This is done by calling createMask.
As you can see, the algorithm is implemented at a high level by invoking three main functions: searchLineAtPoint, processSegment, and createMask. processSegment simply invokes searchLineAtPoint repeatedly, and createMask quickly converts raw pixel data into a CGImageRef. searchLinePoint is where the real meat is, so we’ll quickly cover processSegment and createMask, then dig into searchLinePoint.
Processing a line segment
As stated earlier, processing a line segment that we already know to be in the selection involves walking the points directly above and below it, and performing a line search on them:
- (void) processSegment:(NSDictionary*)segment
{
	// Figure out where this segment actually lies, by pulling the line segment
	//	information out of the dictionary
	NSNumber* leftNumber = [segment objectForKey:kSegment_Left];
	NSNumber* rightNumber = [segment objectForKey:kSegment_Right];
	NSNumber* yNumber = [segment objectForKey:kSegment_Y];
	float left = [leftNumber floatValue];
	float right = [rightNumber floatValue];
	float y = [yNumber floatValue];

	// We're going to walk this segment, and test each integral point both
	//	above and below it. Note that we're doing a four point connect.
	float x = 0.0;
	for ( x = left; x <= right; x = x + 1.0 ) {
		[self searchLineAtPoint: NSMakePoint(x, y - 1.0)]; // check above
		[self searchLineAtPoint: NSMakePoint(x, y + 1.0)]; // check below
	}
}
This is a very simple method. As you can see, most of the method is just pulling the coordinates of the line segment out of the dictionary. After that, we just walk the line segment, checking above and below it by invoking searchLineAtPoint repeatedly.
Creating a CGImageRef
At the end of the algorithm, we have to convert our raw mask data into a CGImageRef that CoreGraphics can use for clipping. Since we set up our mask in the init method to be properly formatted, we just need to hand it to CGImage:
- (CGImageRef) createMask
{
	// This function takes the raw mask bitmap that we filled in, and creates
	//	a CoreGraphics mask from it.

	// Gotta have a data provider to wrap our raw pixels. Provide a callback
	//	for the mask data to be freed. Note that we don't free mMaskData in our
	//	dealloc on purpose.
	CGDataProviderRef provider = CGDataProviderCreateWithData(nil, mMaskData, mMaskRowBytes * mHeight, &MaskDataProviderReleaseDataCallback);

	CGImageRef mask = CGImageMaskCreate(mWidth, mHeight, 8, 8, mMaskRowBytes, provider, nil, false);

	CGDataProviderRelease(provider);

	return mask;
}
Note that we’re creating an actual image mask, and not just an image with a grayscale colorspace. This is why white means off and black means on. If it were an actual image, the colors would be reversed.
Also, as noted in the dealloc method, we don’t free up the raw mask data, mMaskData, because the CGImageRef needs it. Instead we set a release callback, which is invoked when the CGImageRef is freed:
// We allocate the memory for the image mask here, but the CGImageRef is used
//	outside of here. So provide a callback to free up the memory after the
//	caller is done with the CGImageRef.
static void MaskDataProviderReleaseDataCallback(void *info, const void *data, size_t size)
{
	free((void*)data);
}
The callback invokes free on our mask data.
Line search algorithm
The line search algorithm is the heart of the flood fill algorithm. It takes a point and looks for the largest horizontal line segment that matches the given color. The line search is pretty straight forward, but the method to implement is a touch long, so I’ll cover it in three sections.
First, we do what any good programmer does: try to get out of work.
- (void) searchLineAtPoint:(NSPoint)point
{
	// This function will look at the point passed in to see if it matches
	//	the selected pixel. It will then look to the left and right of the
	//	passed in point for pixels that match. In addition to adding a line
	//	segment to the stack (to be processed later), it will mark the mVisited
	//	and mMaskData bitmaps to reflect if the pixels have been visited or
	//	should be selected.

	// First, we want to do some sanity checking. This includes making sure
	//	the point is in bounds, and that the specified point hasn't already
	//	been visited.
	if ( (point.y < 0) || (point.y >= mHeight) || (point.x < 0) || (point.x >= mWidth) )
		return;
	BOOL* hasBeenVisited = (mVisited + (long)point.y * mWidth + (long)point.x);
	if ( *hasBeenVisited )
		return;

	// Make sure the point we're starting at at least matches. If it doesn't,
	//	there's not a line segment here, and we can bail now.
	if ( ![self markPointIfItMatches:point] )
		return;
If the specified point is out of bounds, then we don’t even bother searching. This case happens when we are processing a line segment who is at the edge of the source image. Next we check to see if we’ve already visited this point, and return if we have. This prevents infinite looping, by disallowing the situation where a segment is processed, looks above the segment and finds another segment, processes the above segment, and looks below and sees the original line segment, and processes it, etc ad infinitum. Finally, we check to see if the initial start point even matches the chosen color. If it doesn’t, then there’s not a connected line segment here, and we can stop processing.
Now that we have determined that we have to do work, we do it:
	// Search left, marking pixels as visited, and in or out of the selection
	float x = point.x - 1.0;
	float left = point.x;
	while ( x >= 0 ) {
		if ( [self markPointIfItMatches: NSMakePoint(x, point.y)] )
			left = x; // Expand our line segment to the left
		else
			break; // If it doesn't match, the we're done looking
		x = x - 1.0;
	}

	// Search right, marking pixels as visited, and in or out of the selection
	float right = point.x;
	x = point.x + 1.0;
	while ( x < mWidth ) {
		if ( [self markPointIfItMatches: NSMakePoint(x, point.y)] )
			right = x; // Expand our line segment to the right
		else
			break; // If it doesn't match, the we're done looking
		x = x + 1.0;
	}
The algorithm here is simple: just walk left one pixel at a time and check to see if the current pixel matches the chosen color. As soon as we reach a pixel that does not match the chosen color, we stop looking, and remember the left most point that matched our color. We then do the same thing, but working to the right. Note that we skip the initial point, since we already checked it at the top of the method.
The last step in the line search is to add our newly discovered line segment to the stack for further processing:
	// Push the segment we just found onto the stack, so we can look above
	//	and below it later.
	NSDictionary* segment = [NSDictionary dictionaryWithObjectsAndKeys:
								[NSNumber numberWithFloat:left], kSegment_Left,
								[NSNumber numberWithFloat:right], kSegment_Right,
								[NSNumber numberWithFloat:point.y], kSegment_Y,
								nil];
	[mStack addObject:segment];
}
As stated before, instead of creating a custom class to hold a line segment, we just stuff the left, right, and y values into an NSDictionary.
As you probably noted, we’re using a helper function, markPointIfItMatches, to determine if a given point matches our chosen color. However, as the name implies, the helper function also marks the point in the mask, if it matches, and the point in the visited map. So although the algorithm described in the overview marks one line segment at a time, in practice, we mark one pixel at a time.
- (BOOL) markPointIfItMatches:(NSPoint) point
{
	// This method examines a specific pixel to see if it should be in the selection
	//	or not, by determining if it is "close" to the user picked pixel. Regardless
	//	of it is in the selection, we mark the pixel as visited so we don't examine
	//	it again.

	// Do some sanity checking. If its already been visited, then it doesn't
	//	match
	BOOL* hasBeenVisited = (mVisited + (long)point.y * mWidth + (long)point.x);
	if ( *hasBeenVisited )
		return NO;

	// Ask a helper function to determine if the pixel passed in matches
	//	the user selected pixel
	BOOL matches = NO;
	if ( [self pixelMatches:point] ) {
		// The pixels match, so return that answer to the caller
		matches = YES;

		// Now actually mark the mask
		unsigned char* maskRow = mMaskData + (mMaskRowBytes * (long)point.y);
		maskRow[(long)point.x] = 0x00; // all on
	}

	// We've made a decision about this pixel, so we've visted it. Mark it
	//	as such.
	*hasBeenVisited = YES;

	return matches;
}
The first thing we do when checking a pixel to see if it matches, is we look it up in the visited map. If we’ve already visited the point, then it doesn’t match for sure, so we bail early.
Next, we compare the color at the point with the user chosen color. If it matches, the corresponding point in the mask is set to black, thus including it in the selection.
Finally, no matter if the color matches or not, we mark the point in the visited map, so that we don’t process this point again.
Matching colors
Something that we have ignored this entire time is how we actually compare colors and see if they match, given a tolerance level. There are many different ways to do this, but here I’ll present a very simple, yet efficient, way of doing it.
The pixelMatches method is the function that determines if color at a specified point matches:
- (BOOL) pixelMatches:(NSPoint)point
{
	// We don't do exact matches (unless the tolerance is 0), so compute
	//	the "difference" between the user selected pixel and the passed in
	//	pixel. If it's less than the specified tolerance, then the pixels
	//	match.
	unsigned int difference = [self pixelDifference:point];

	return difference <= mTolerance;
}
The idea here is to compute the “difference” between the color at the point and the chosen color, and then see if the difference is less than the tolerance level. Note that difference is in the color component range, so it will change based on the source image format. i.e. If you have pixel format with 8-bit components, then difference will range between 0 and 255.
Computing the difference between colors is the heart of color matching:
- (unsigned int) pixelDifference:(NSPoint)point
{
	// This method determines the "difference" between the specified pixel
	//	and the user selected pixel in a very simple and cheap way. It takes
	//	the difference of all the components (except alpha) and which ever
	//	has the greatest difference, that's the difference between the pixels.

	// First get the components for the point passed in
	unsigned int pixel[kMaxSamples];
	[mImageRep getPixel:pixel atX:(int)point.x y:(int)point.y];

	// Determine the largest difference in the pixel components. Note that we
	//	assume the alpha channel is the last component, and we skip it.
	unsigned int maxDifference = 0;
	int samplesPerPixel = [mImageRep samplesPerPixel];
	int i = 0;
	for (i = 0; i < (samplesPerPixel - 1); ++i) {
		unsigned int difference = abs((long)mPickedPixel[i] - (long)pixel[i]);
		if ( difference > maxDifference )
			maxDifference = difference;
	}

	return maxDifference;
}
The first thing we do when computing the difference is to retrieve the raw pixel components from the current point. As with the chosen color, we assume that we won’t get more than five components, including the alpha channel. In real system, we’d want to ask the colorspace for the number of components, and dynamically allocate the raw pixel components.
The general idea here is to compute the absolute difference between each component in the chosen color versus the current color. We say the difference between two colors is the largest difference between the individual color components. Note that we skip the alpha channel, which we assume is going to be the last component. This is not always true, and in a real system we should ask the NSBitmapImageRep where the alpha channel is.
Also note that humans don’t process colors this way. We might end up selecting colors that don’t look all that similar in one instance, but fail to select colors that look very close in another instance.
…
Wow, that’s a lot of information, but that completely covers the flood fill algorithm. It takes a source image and a staring point, and returns an image mask.
PathBuilder
The PathBuilder class implements an algorithm that converts an image mask into a vector path. It has two phases: one to build up all the one pixel line segments around the mask, and one to convert all those one pixel line segments into a closed vector path.
PathBuilder actually gets down into the mask pixel data and manually iterates through it. To do that, we need to convert our mask back from a CGImageRef into an array of unsigned chars. This is done in the init method:
- (id) initWithMask:(CGImageRef)mask
{
	self = [super init];

	if ( self != nil ) {
		// CGImageRef doesn't allow use to easily grab the pixels and walk them
		//	manually (which is what we want to do). So we're going to create
		//	a grayscale CGBitmapContext, use the mask to draw white pixels in
		//	the area defined by the mask. Then we'll release the bitmap context
		//	but keep the raw mask pixels around to parse through.

		// Grab the size of the mask, so we know how big to make our bitmap
		//	context.
		mWidth = CGImageGetWidth(mask);
		mHeight = CGImageGetHeight(mask);

		// Allocate space for our mask data. Calloc will zero out the data so
		//	all pixels will be black by default.
		mMaskRowBytes = (mWidth + 0x0000000F) & ~0x0000000F;
		mMaskData = calloc(mHeight, mMaskRowBytes);

		// Create a grayscale bitmap context the size of the mask
		CGColorSpaceRef colorspace = CGColorSpaceCreateWithName(kCGColorSpaceGenericGray);
		CGContextRef bitmapContext  = CGBitmapContextCreate(mMaskData, mWidth, mHeight, 8, mMaskRowBytes, colorspace, kCGImageAlphaNone);
		CGColorSpaceRelease(colorspace);

		// Clip out everything not selected by the mask, then draw a white rectangle
		//	so we know the pixels defined by the mask.
		CGRect maskRect = CGRectMake(0, 0, mWidth, mHeight);
		CGContextClipToMask(bitmapContext, maskRect, mask);
		CGContextSetGrayFillColor(bitmapContext, 1.0, 1.0);
		CGContextFillRect(bitmapContext, maskRect);

		// Don't need the context anymore, we just wanted the pixels
		CGContextRelease(bitmapContext);
	}

	return self;
}
Although there is a lot of code here, the goal is singular: retrieve the raw pixel data from the mask. The complication is that CGImageRef does not offer a way to directly access the pixel data. So, we create a bitmap context with all black pixels, use the mask to define the clipping region, then draw a white rectangle to cover the entire context. Since we clipped out all pixels not in the mask, only the pixels in the mask become white in the bitmap context. This gives us the pixel data of the image mask in the bitmap context.
Well, technically, it gives us the inverse of the image mask (remember that selected pixels in the mask are black, not white). However since we’re not going to use the pixel data as an actual mask, it will work just as well. Furthermore, calloc() automatically gives us the black pixels, which means it’s more efficient since we don’t have to do a memset() on the pixels to clear to white.
There is also a dealloc method that simply frees up mMaskData.
The driver method for the PathBuilder class is path:
- (NSBezierPath *) path
{
	// This method invokes two methods that will build a bounding path around
	//	a bitmap mask. First, it parses the mask data to build up a dictionary
	//	of line segments. Second, in takes all those line segments, and converts
	//	then into a bezier path.
	NSMutableDictionary* segments = [self buildLineSegments];

	return [self convertSegmentsIntoPath:segments];
}
The path method simply invokes the first phase, implemented by buildLineSegments, then passes its results to the second phase, implemented by convertSegmentsIntoPath. Next we’ll cover each of the phases.
Phase 1
The first phase basically does edge detection on the image mask and creates an unordered list of one pixel line segments. The first phase is implemented primarily in the buildLineSegments method:
- (NSMutableDictionary*) buildLineSegments
{
	// The purpose of this function is to simply walk the mask and determine where
	//	the bounding line segments of the path should go. It does not attempt
	//	to make sure they are in order or connected.

	// It examines each pixel. If the pixel is in the mask (not black), then it
	//	looks at the pixels to the left, right, above, and below the pixel. For each of those
	//	pixels around the current pixel that is not in the mask (black) it adds a
	//	line segment on that side to the dictionary.

	// The dictionary that is return maps pixel locations to line segments, so they
	//	can be easily connect later on. For example, the line segment [(20, 15), (21, 15)]
	//	would appear in the dictionary twice: at the key (20, 15) and the key (21, 15).

	// Create a dictionary for all these line segments, keyed on the points that make
	//	up the segment.
	NSMutableDictionary* segments = [[[NSMutableDictionary alloc] init] autorelease];

	// This loop straight up hits every pixel in the mask in row major order
	int row = 0;
	for (row = 0; row < mHeight; ++row) {
		int col = 0;

		unsigned char *rowPixels = mMaskData + (row * mMaskRowBytes);

		for (col = 0; col < mWidth; ++col) {
			if ( rowPixels[col] != 0x00 ) {
				// This pixel is on, check all around us to see if we're bounded
				//	anywhere.

				// Bounded on the left
				if ( col == 0 || rowPixels[col - 1] == 0x00 )
					[self insertLineStart: NSMakePoint(col, row) end: NSMakePoint(col, row + 1) intoDictionary:segments];

				// Bounded on the right
				if ( col == (mWidth - 1) || rowPixels[col + 1] == 0x00 )
					[self insertLineStart: NSMakePoint(col + 1, row) end: NSMakePoint(col + 1, row + 1) intoDictionary:segments];

				// Bounded on the top
				if ( row == 0 || *(rowPixels + col - mMaskRowBytes) == 0x00 )
					[self insertLineStart: NSMakePoint(col, row) end: NSMakePoint(col + 1, row) intoDictionary:segments];

				// Bounded on the bottom
				if ( row == (mHeight - 1) || *(rowPixels + col + mMaskRowBytes) == 0x00 )
					[self insertLineStart: NSMakePoint(col, row + 1) end: NSMakePoint(col + 1, row + 1) intoDictionary:segments];
			}
		}
	}

	// Return the unsorted segments
	return segments;
}
This method is really straight forward. For each pixel in the mask data, it checks to see if it is “on” in the mask, meaning it is white. If it is, then further processing needs to be done. Each of the four directions, left, right, top, and bottom are checked to see if there are pixels not in the mask (i.e. black). If that is the case, we add a line segment for that side to our dictionary. This is handled by the insertLineStart method:
- (void) insertLineStart:(NSPoint)start end:(NSPoint)end intoDictionary:(NSMutableDictionary*)segments
{
	// This function takes the raw points of a segment and ensures that the segment
	//	is correct inserted into the segments dictionary. This includes building
	//	the keys for the start and end point, and inserting the segment twice; Once
	//	for the start point, and again for the end point.
	// Since all the lines will eventually connect, more than one segment will
	//	map to a given point, or entry in the dictionary. For that reason, the
	//	value in the dictionary is actually an array of line segments.

	// Convert from top, left origin to bottom, left origin (bitmap to CG coords)
	NSPoint startPoint = NSMakePoint(start.x, mHeight - start.y - 1);
	NSPoint endPoint = NSMakePoint(end.x, mHeight - end.y - 1);

	// Pull out the values that will go in the dictionary
	NSString *startKey = NSStringFromPoint(startPoint);
	NSString *endKey = NSStringFromPoint(endPoint);
	NSArray *segment = [NSArray arrayWithObjects:startKey, endKey, nil];

	// Add the segment to the dictionary for the start point. If a segment
	//	array isn't already at the specified point, add it.
	NSMutableArray *segmentsAtStart = [segments objectForKey:startKey];
	if ( segmentsAtStart == nil ) {
		segmentsAtStart = [[[NSMutableArray alloc] init] autorelease];
		[segments setObject:segmentsAtStart forKey:startKey];
	}
	[segmentsAtStart addObject:segment];

	// Add the segment to the dictionary for the end point. If a segment
	//	array isn't already at the specified point, add it.
	NSMutableArray *segmentsAtEnd = [segments objectForKey:endKey];
	if ( segmentsAtEnd == nil ) {
		segmentsAtEnd = [[[NSMutableArray alloc] init] autorelease];
		[segments setObject:segmentsAtEnd forKey:endKey];
	}
	[segmentsAtEnd addObject:segment];
}
Since we don’t know which direction we will approach a line segment, we have to add the line segment to the dictionary both at its start point and its end point. Because of this, all keys will have two line segments in their entry in the dictionary, so we actually use an array of line segments.
At the end of phase one, we have a big bucket of line segments that completely bound the image mask, but are not in order. If we were to change insertLineStart to simply add each line segment to a NSBezierPath, it would create a path around the image mask. However the line segments would not be properly connected, and stroking a line dash pattern would not work as expected.
Phase 2
In phase two we’re going to take all those unordered line segments and make them into a connected, ordered vector path, namely a NSBezierPath. The starting point for phase two is the convertSegmentsIntoPath method:
- (NSBezierPath *) convertSegmentsIntoPath:(NSMutableDictionary*)segments
{
	// This method walks through the line segments dictionary constructing
	//	bezier paths. As a line segment is transversed, it is removed from
	//	the dictionary so that it isn't used again. Since there can be
	//	more than one closed path, continue even after one path is complete,
	//	until all line segments have been consumed.

	NSBezierPath *path = [NSBezierPath bezierPath];

	// While we still have line segments to consume, unwind one bezier path
	while ( [segments count] > 0 )
		[self unwindOneSegmentPath:segments intoPath:path];

	return path;
}
As you can see it accepts the dictionary of line segments from the first phase as input, and returns a NSBezierPath as its output. The primary purpose of this function is to unwind one path at a time, using the unwindOneSegmentPath method, until there are no more line segments in the dictionary. The loop is necessary because sometimes the selection mask has “holes” in it, like the letter O, which means that there is more than one closed path represented in the dictionary.
The unwindOneSegmentPath method is responsible for creating one closed subpath from the dictionary of line segments. It is fairly involved, so we’ll cover it one section at a time:
- (void) unwindOneSegmentPath:(NSMutableDictionary*)segments intoPath:(NSBezierPath *)path
{
	// This method will grab the first line segment it can find, then unwind it
	//	into a bezier path. Since all the line segments are key on the points
	//	the start and stop at, it is fairly trivial to connect them.

	// The algorithm is:
	//	1. Given a point, look up the array of segments that have end points there
	//	2. Grab the first segment in the array
	//	3. Draw a line to point in the line segment, that we weren't given
	//	4. Remove the line segment from the dictionary, so we don't process it again
	//	5. Go back to 1, with the point we just drew a line to as the given point

	// There is also an optimization so that we don't add 1 pixel line segments
	//	unless we have to. It accumulates the start and end points until the
	//	path changes direction. At the time, it flushes out the line segment
	//	to the path, and adds the new point to the cache.

	// Just pick the first key to start with. It might be slightly better if
	//	we could pick a corner to start at, so we create the path with fewer
	//	segments. But the cost of finding a corner might negate any gain.
	NSEnumerator *keyEnumerator = [segments keyEnumerator];
	NSString *key = [keyEnumerator nextObject];
	NSMutableArray *segmentsAtPoint = nil;

	// Start the path off. The rest of the path additions will be simple lineTo's
	NSPoint pathStartPoint = NSPointFromString(key);
	[path moveToPoint: pathStartPoint];
We need to start with a point to unravel a path. Optimally, it would probably be best if we could pick a corner to start at, but that’s a lot more trouble than it’s worth. So we simply ask the dictionary for the first key it can find. We then convert the key from a string into the NSPoint that we’ll start out at. We move the current point in our bezier path here. All other path operations will be linetos until we close the subpath.
Although adding the one pixel line segments one at a time would technically give us the correct bezier path, we’d like to be more efficient. As such, we keep a cache of the current line segment we’re building around:
	// The cached points are used to accumulate lines so we don't insert
	//	tons of 1 pixel lines, but one large line.
	NSPoint cachedPoint1 = pathStartPoint;
	NSPoint cachedPoint2 = pathStartPoint;
I’ll dig into this a bit more later on, but in general, when a new line segment just extends the current one, we don’t add it to the NSBezierPath, we just save it in our cache. When we get to a line segment that changes direction, we flush the current line segment out to the NSBezierPath, and add the new line segment to the cache.
Now that we’ve set up our starting point, we’re going to drop into a loop and unravel this path:
	// While we haven't reach the end of the path. At the end of the path
	//	we would normally connect back up with the start. But since we
	//	remove line segments as we process them, it won't be in the map. That's
	//	our indication to stop.
	while ( segmentsAtPoint = [segments objectForKey:key] ) {
		// Convert the key to a NSPoint so we know the point the line segments
		//	connect at.
		NSPoint connectPoint = NSPointFromString(key);
At the top of the loop we ask for all the line segments at our current point, from the dictionary. If there are none, then we know we’ve looped back on ourselves and have completed the subpath, so we can stop. We know this because right after we transverse a line segment, we remove it from the dictionary.
When we get a list of line segments to follow, we have to pick one:
		// It really doesn't matter which segment in this array we pick, but
		//	it's guaranteed to have at least one, and the first is always the
		//	easiest to pick. Convert its end points to real points so we can
		//	compare.
		NSArray *firstSegment = [segmentsAtPoint objectAtIndex:0];
		NSPoint segmentStartPoint = NSPointFromString([firstSegment objectAtIndex:0]);
		NSPoint segmentEndPoint = NSPointFromString([firstSegment objectAtIndex:1]);
We arbitrarily pick the first line segment in the array, because it’s guaranteed to be there. But it doesn’t really matter which line segment we pick; we’ll eventually make it all the way around the path.
We know that the current point in our NSBezierPath is either segmentStartPoint or segmentEndPoint, because that’s how we arrived at this dictionary entry. Since we’re already at one of the points, it wouldn’t make much sense to create line from it, to itself. So we want to make a line to the point we’re not already at:
		// See which point in this segment we've already visited. Draw a line
		//	to the end point we haven't visited, and make it the next key
		//	we visit in the dictionary.
		if ( NSEqualPoints(connectPoint, segmentStartPoint) ) {
			// We've alreay hit the start point, so add the end point to the path
			[self addPoint:segmentEndPoint toPath:path cachedPoint1:&cachedPoint1 cachedPoint2:&cachedPoint2];
			key = NSStringFromPoint(segmentEndPoint);
		} else {
			// We've alreay hit the end point, so add the start point to the path
			[self addPoint:segmentStartPoint toPath:path cachedPoint1:&cachedPoint1 cachedPoint2:&cachedPoint2];
			key = NSStringFromPoint(segmentStartPoint);
		}
If we’re already at the start point, do a lineto to the end point. If we’re already at the end point of the segment, do a lineto to the start point. Either way, the point we just did a lineto to, becomes our new current point, as well as the next point we’ll look up in the dictionary.
Note that we use a helper function, addPoint, to perform the lineto on the NSBezierPath. This is so it can hide the details of the caching scheme we use.
The final thing we need to do inside the loop is remove the line segment we just processed from the dictionary. We do this so we know when we have completed a subpath, and so we don’t loop forever:
		// It's very important that we remove the line segment from the dictionary
		//	completely so we don't loop back on ourselves or not ever finish.
		[self removeSegment:firstSegment fromSegmentPath:segments];
	}
Finally, we need to do some clean up before we’re done with this subpath:
	// Since we were caching line segments to write out the biggest line segments
	//	possible, we need to flush the last one out to the bezier path.
	[self flushPath:path cachedPoint1:&cachedPoint1 cachedPoint2:&cachedPoint2];

	// Close up the sub path, so that the end point connects with the start point.
	[path closePath];
}
Cleaning up includes flushing out the last cached line segment to the NSBezierPath, then ensuring said bezier path is closed. By the end of this function, we have added one more subpath to our bezier path.
Next we need to examine the implementation of some of the helper methods, such as removeSegment. It essentially does the inverse of insertLineStart:
- (void) removeSegment:(NSArray*)segment fromSegmentPath:(NSMutableDictionary*)segments
{
	// This method removes the specified line segment from the dictionary. Every
	//	line segment is in the dictionary twice (at the start point and the end point)
	//	so remove it at both locations.

	// Look up both start and end points, and remove them from their respective arrays
	NSString* startKey = [segment objectAtIndex:0];
	NSString* endKey = [segment objectAtIndex:1];

	NSMutableArray *segmentsAtStart = [segments objectForKey:startKey];
	NSMutableArray *segmentsAtEnd = [segments objectForKey:endKey];

	if ( [segmentsAtStart count] == 1 )
		[segments removeObjectForKey:startKey]; // last one, so kill entire array
	else
		[segmentsAtStart removeObject:segment]; // just remove use from this array

	if ( [segmentsAtEnd count] == 1 )
		[segments removeObjectForKey:endKey]; // last one, so kill entire array
	else
		[segmentsAtEnd removeObject:segment]; // just remove use from this array
}
All this method does is remove the line segment from the dictionary at both its start point and end point. Since when we transverse a line segment, we enter at one of the points and leave at the other, it is fully processed afterwards and shouldn’t be processed again.
Also note that if the given line segment is the last one in the array, then the entire array is removed from the dictionary. This is how we can be sure we have completed a path when a dictionary look up fails in the unwindOneSegmentPath method. It is also why we can assume that there is at least one line segment at a point that has an entry in the dictionary.
Finally, we have a simple caching scheme to ensure that we are adding the longest possible line segments to the NSBezierPath. Every time we want to add a line segment to the NSBezierPath, we invoke the helper function, addPoint:
- (void) addPoint:(NSPoint)newPoint toPath:(NSBezierPath *)path cachedPoint1:(NSPoint*)point1 cachedPoint2:(NSPoint*)point2
{
	// This method examines the current line segment to determine if it's part
	//	of the currently building large line segment. If it is, we just make it
	//	the new end point. If it represents a change in direction, then we
	//	flush the current large line segment out to the path, and create a new
	//	line segment with the old end point and the new point.

	// Check for the special case of the path start point. In that case, just
	//	make the new point the new end point of the current line segment.
	if ( NSEqualPoints(*point1, *point2) ) {
		*point2 = newPoint;
		return;
	}

	// If we're not changing direction, then just extend the line
	if ( (point1->x == point2->x && point2->x == newPoint.x) || (point1->y == point2->y && point2->y == newPoint.y) ) {
		*point2 = newPoint;
	} else {
		// We changed direction, so flush the current segment, and reset the cache
		[path lineToPoint:*point2];

		*point1 = *point2;
		*point2 = newPoint;
	}
}
The first thing we do is check for the special case of adding the first point to the path. In this case, the start and end cached points will be the same, so we can just overwrite the cached end point with the new point.
However, if it is not a special case, we have to check to see if the new point continues the current line segment, or changes direction. A new point extends the current line segment if all three points have the same x coordinates, but different y coordinates. That means the current line segment is a vertical line. The same is true if all three points have the same y coordinates, but different x coordinates, except then it is a horizontal line. In this case, we can just extend the current line segment by making the new point the current line segment end point.
If the new point represents a change in direction, then the current line segment is as long as it is going to be. So we flush the current line segment to the NSBezierPath, then shift the cached points into the new direction. This means moving the end point of the current line segment into the start point, and making the new point the current line segment’s end point.
As you probably have noticed this caching scheme means that at the end of the loop in unwindOneSegmentPath, we might end up with a line segment that has not yet been added to the NSBezierPath. To fix this, unwindOneSegmentPath calls flushPath:
- (void) flushPath:(NSBezierPath *)path cachedPoint1:(NSPoint*)point1 cachedPoint2:(NSPoint*)point2
{
	// Just add the last line to the path.
	[path lineToPoint:*point2];
}
This is an ultra-simple function, that adds the end point of the current line segment to the bezier path.
This concludes the PathBuilder class, and really, the full implementation of a magic wand tool. The rest of this article is gravy.
Implementing a paint bucket tool
Although this article has been about implementing a magic wand tool, we are so close to implementing a paint bucket tool, I thought I would cover it briefly here.
Like the magic wand tool, the paint bucket tool would have a tolerance parameter. On mouse down, it would ask the Canvas for an image mask back, using the floodFillSelect method. It would then pass the image mask, and the new fill color (or image, or pattern, etc) into the Canvas class. The Canvas class would need a new method to handle this. It would look something like this:
- (void) fillMask:(CGImageRef)mask withColor:(NSColor *)color
{
	// We want to render the image into our bitmap image rep, so create a
	//	NSGraphicsContext from it.
	NSGraphicsContext* imageContext = [NSGraphicsContext graphicsContextWithBitmapImageRep:mImageRep];
	CGContextRef cgContext = [imageContext graphicsPort];

	// "Focus" our image rep so the NSImage will use it to draw into
	[NSGraphicsContext saveGraphicsState];
	[NSGraphicsContext setCurrentContext:imageContext];

	// Clip out everything that we don't want to fill with the new color
	NSSize canvasSize = [self size];
	CGContextClipToMask(cgContext, CGRectMake(0, 0, canvasSize.width, canvasSize.height), mSelection);

	// Set the color and fill
	[color set];
	[NSBezierPath fillRect: NSMakeRect(0, 0, canvasSize.width, canvasSize.height)];

	[NSGraphicsContext restoreGraphicsState];
}
First, we create a graphics context from our bitmap image representation. Then we clip to our image mask, so that we don’t draw on pixels that we’re not supposed to. Finally, we set the new color and fill a rectangle the size of the canvas.
That’s all there is to doing a paint bucket tool.
Conclusion
Holy cows, I’ve written so much, I don’t think I really need a conclusion. This was a lot of fun to figure out, and hopefully this will either satisfy someone’s idle curiosity or help future graphics editor authors.
The only thing left for you to do is download the sample code.